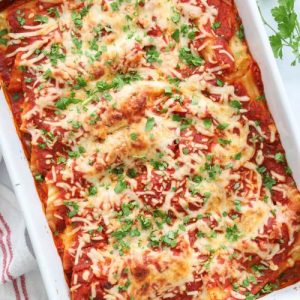
This stuffed manicotti is the ultimate comfort food made simple—tender pasta shells filled with a creamy, cheesy blend and baked to perfection in a rich marinara sauce.
With a balance of protein from ricotta and mozzarella, plus calcium-rich Parmesan, it’s both hearty and nourishing.
Easy to prepare in under an hour, it’s a satisfying option for busy weeknights, meal prep, or family dinners that feels both indulgent and wholesome.
Easy Stuffed Manicotti
Equipment
- 1 large mixing bowl
- 1 whisk or spoon for mixing
- 1 Gallon-sized resealable bag (for piping)
- 1 large pot (for boiling pasta)
- 1 colander (for draining pasta)
- 1 9×13-inch baking dish
- 1 oven
Ingredients
- 12 –14 manicotti pasta shells
- 2 cups ricotta cheese
- 3 cups mozzarella cheese divided
- ½ cup Parmesan cheese
- 1 large egg
- 1 teaspoon salt
- ¼ teaspoon black pepper
- 3 cups marinara sauce divided
- Fresh parsley chopped (for garnish)
Instructions
- Prepare the cheese filling: In a large mixing bowl, combine the ricotta cheese, two cups of shredded mozzarella, and the Parmesan. Crack in the egg, then sprinkle in the salt and black pepper. Stir everything together until the mixture is smooth, creamy, and evenly blended. The texture should be thick enough to hold its shape but soft enough to pipe easily into the pasta shells.
- Transfer filling for piping: Spoon the cheese mixture into a gallon-sized resealable bag. Push the mixture down toward one corner of the bag and squeeze out any air before sealing it. Snip off a small piece of the corner so you can use the bag as a piping tool. This makes it much easier to neatly fill the manicotti without tearing them.
- Boil the manicotti shells: Bring a large pot of salted water to a boil and carefully add the manicotti shells. Cook them until al dente, which means tender but still firm to the bite. Avoid overcooking since they will continue cooking in the oven. Drain the shells in a colander once they’re ready.
- Cool the pasta shells: Run the drained pasta under cold water to stop the cooking process and keep the shells from becoming too soft. This also prevents them from sticking together. Spread them out on a flat surface or lightly greased tray so they are easy to handle when filling.
- Fill each manicotti shell: Using the prepared piping bag, gently squeeze the cheese filling into each shell. Start at one end and fill slowly toward the other. If needed, pipe from both ends so the filling spreads evenly inside. Continue until all of the pasta shells are generously filled.
- Prepare the baking dish: Grease a 9×13-inch baking dish lightly, then spread one cup of marinara sauce across the bottom. Coat the base evenly with sauce to prevent the pasta from sticking or drying out during baking.
- Arrange the stuffed pasta: Place the filled manicotti shells into the baking dish in a single layer. Pour the remaining marinara sauce evenly over the top, making sure each shell is well covered. Sprinkle the last cup of shredded mozzarella cheese across the surface.
- Bake until bubbly and golden: Preheat the oven to 350°F (175°C). Cover the dish with foil and bake for about 20–25 minutes, or until the cheese is fully melted and the filling is heated through. For a browned, bubbly top, remove the foil and broil for a few minutes at the end while keeping a close eye to avoid burning.
- Garnish and serve hot: Once the manicotti is finished baking, remove it from the oven and allow it to rest for a few minutes before serving. Sprinkle freshly chopped parsley over the top for a burst of color and freshness. Serve hot with salad, garlic bread, or roasted vegetables for a complete Italian-inspired meal.
Notes
- Cook pasta al dente only: The shells should be slightly firm since they continue cooking in the oven. Overcooked pasta will become too soft and difficult to fill.
- Rinse to stop cooking: Running the shells under cold water halts the cooking process and keeps them from sticking together.
- Pipe instead of spooning: Using a resealable bag or piping bag makes filling easier, faster, and prevents breakage.
- Sauce underneath and on top: Spreading sauce at the bottom prevents dryness and ensures the pasta absorbs flavor evenly while baking.
- Rest before serving: Allowing the dish to cool for a few minutes helps the filling firm up, making serving neater.
Chef’s Secrets for Perfect Manicotti
The key to a flawless manicotti bake lies in balancing textures.
Undercook the pasta slightly so it holds its shape while you fill it.
Use a thick but creamy cheese filling so it pipes smoothly and doesn’t ooze out during baking.
Always start with a layer of sauce beneath the shells; this not only prevents sticking but keeps the pasta tender and moist.
For a restaurant-style finish, broil at the end to achieve that irresistible golden-bubbly top.
And finally, let the dish rest before serving—this little pause makes the flavors meld beautifully and the filling easier to handle.
Serving Suggestions to Enhance Flavor
This dish is satisfying on its own, but thoughtful pairings turn it into a complete Italian-inspired meal.
Serve alongside a crisp green salad dressed with balsamic vinaigrette to balance the richness of the cheese filling.
Garlic bread or focaccia is a natural companion, perfect for scooping up extra marinara sauce.
For a lighter side, roasted vegetables such as zucchini, bell peppers, or asparagus add freshness and color to the table.
To make it dinner-party worthy, pair with a medium-bodied red wine like Chianti or a sparkling water with lemon for a refreshing non-alcoholic option.
Storage Tips for Freshness and Flavor
Stuffed manicotti stores beautifully, making it ideal for meal prep or leftovers.
Once cooled completely, cover the baking dish tightly with foil or transfer individual portions into airtight containers.
Refrigerated, it will keep for 3–4 days.
For longer storage, freeze the unbaked manicotti in a sauce-lined dish, tightly wrapped in foil, for up to 2 months—just thaw overnight in the fridge before baking.
If freezing after baking, store in freezer-safe containers and reheat gently in the oven to preserve the texture of the cheese filling.
Always avoid microwaving directly from frozen to prevent uneven heating.
Frequently Asked Questions
1. Can I make this ahead of time?
Yes! You can stuff the shells and arrange them in the baking dish with sauce up to 24 hours ahead. Keep covered in the fridge, then bake when ready. Just add a few extra minutes of baking time if chilled.
2. What if I can’t find manicotti shells?
You can substitute with large cannelloni shells or even use cooked lasagna sheets rolled around the filling. The flavor and texture will still be delicious, though the presentation will vary slightly.
3. Can I add meat to the filling?
Absolutely. Cooked ground beef, Italian sausage, or even shredded chicken can be mixed into the cheese filling for extra protein and a heartier meal.
Just make sure the meat is fully cooked and well-drained before combining.
4. How can I make this lighter?
Swap part of the ricotta for cottage cheese, use reduced-fat mozzarella, or incorporate sautéed spinach or finely chopped vegetables into the filling. These adjustments cut down on fat while adding extra nutrients.
5. How do I reheat leftovers?
The best way is to cover the manicotti with foil and warm it in a 350°F oven until heated through. For single portions, a microwave works, but add a splash of sauce on top to prevent drying out.