These Toasted Coconut Bars are a quick, no-bake treat packed with natural sweetness and wholesome ingredients.
Loaded with plant-based protein from nuts and fiber from dates and coconut, they make a satisfying snack or dessert.
Low in refined sugar and rich in healthy fats, these bars are perfect for meal prep, on-the-go energy, or a guilt-free indulgence anytime.
Toasted Coconut Bars
Equipment
- Large frying pan – 1
- Food processor (1)
- 20 cm (8-inch) square baking tin – 1
- Parchment paper (1 sheet)
- Heatproof bowl – 1
- Saucepan (for water bath) – 1
Ingredients
Base:
- 100 g 1 cup desiccated coconut
- 200 g 1½ cups soft Medjool dates, pitted
- 100 g 1 cup ground almonds
- 125 g 1 cup mixed nuts, such as cashews and almonds
- ½ tsp sea salt optional
Topping:
- 100 g ⅔ cup dark chocolate
- 2 –3 tbsp desiccated coconut or flaked almonds optional
Instructions
- Toast the Coconut for Maximum Flavor: Place 100 g (1 cup) of desiccated coconut into a large, dry frying pan. Turn the heat to medium and gently stir the coconut continuously. Within about 5 minutes, the coconut will turn a light golden brown and release a nutty aroma. Toasting enhances the flavor and gives the bars a richer, more complex taste. Be careful not to let it burn, as it can go from golden to bitter very quickly. Once toasted, remove the coconut from the pan and allow it to cool slightly.
- Prepare the Base Ingredients: Gather 200 g (1½ cups) of pitted soft Medjool dates, 100 g (1 cup) of ground almonds, 125 g (1 cup) of mixed nuts (such as cashews and almonds), and ½ tsp of sea salt if using. Place all these ingredients into a food processor along with the toasted coconut.
- Blend the Base Until Smooth and Sticky: Pulse the food processor in short bursts, scraping down the sides occasionally, until the mixture becomes uniform. It should hold together when pressed between your fingers. If the mixture feels too dry and crumbly, add 1–2 tablespoons of water gradually until it binds easily. Avoid adding too much water, as it will make the mixture overly sticky and hard to press into the tin.
- Press the Base into the Tin: Line a 20 cm (8-inch) square baking tin with parchment paper, ensuring some overhang for easy removal later. Transfer the processed mixture into the tin and use your fingers or a spatula to press it down firmly and evenly. Make sure the surface is smooth and compact so that the bars hold their shape after chilling.
- Chill the Base While Melting Chocolate: Place the tin in the refrigerator for at least 20–30 minutes to firm up the base. Meanwhile, prepare the chocolate topping.
- Melt the Chocolate Carefully: Break 100 g (⅔ cup) of dark chocolate into small pieces and place them in a heatproof bowl. Set the bowl over a saucepan of gently simmering water (double boiler method), ensuring the bottom of the bowl doesn’t touch the water. Stir continuously until the chocolate is completely melted and smooth. This prevents the chocolate from seizing or burning. Remove the bowl from heat once fully melted.
- Add Optional Toppings for Extra Texture: If desired, prepare 2–3 tablespoons of extra desiccated coconut or flaked almonds to sprinkle on top. These add texture, flavor, and a visually appealing finish.
- Pour and Spread the Chocolate Layer: Take the chilled base out of the fridge. Pour the melted chocolate evenly over the top and use a spatula to spread it gently, covering the entire surface. Sprinkle the optional coconut or almond toppings evenly before the chocolate sets.
- Final Chill Until Set: Return the tin to the refrigerator for another 15–20 minutes, or until the chocolate layer is fully set and firm to the touch. This ensures clean cutting and prevents the chocolate from smudging.
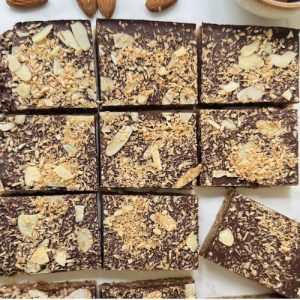
- Cut into Bars and Serve: Lift the bars out of the tin using the parchment paper overhang. Place on a cutting board and slice into 12 (or 15 smaller) squares using a sharp knife. For cleaner cuts, wipe the knife with a warm, dry cloth between slices.
- Storage and Enjoyment: Store the bars in an airtight container in the refrigerator for up to 5–6 days. They can also be frozen for up to 3 months, making them perfect for meal prep or a ready-to-go snack. Let frozen bars thaw slightly at room temperature before enjoying for the best texture.
Notes
- Always toast the coconut first to bring out its natural nuttiness; this step elevates the flavor significantly.
- Choose soft Medjool dates—they blend more easily and help the mixture bind without added sugar or syrups.
- Use a food processor with a strong motor to ensure nuts and dates combine evenly.
- When pressing the base into the tin, make it compact to prevent the bars from falling apart when cut.
- Feel free to adjust the chocolate topping thickness; a thin layer lets the coconut and nuts shine, while a thicker layer gives extra richness.
- Optional toppings like flaked almonds or extra coconut add texture and make the bars more visually appealing.
Chef’s Secrets: Tips To Enhance Flavor
The key to making these Toasted Coconut Bars stand out is in the small details.
Toasting the coconut gently brings out a deep, nutty aroma that transforms the flavor of the base.
Using a combination of almonds and cashews adds natural sweetness and creaminess while boosting plant-based protein.
For an extra smooth chocolate topping, melt the chocolate over a gentle water bath rather than microwaving to prevent it from seizing.
Pressing the base firmly into the tin ensures clean-cut bars that hold their shape perfectly.
Finally, letting the bars chill fully before slicing improves texture and flavor integration.
Serving Suggestions: Delicious Ways To Enjoy
These bars are incredibly versatile and can be enjoyed any time of day.
Serve them as a quick breakfast-on-the-go with a cup of coffee or tea, or as a post-workout snack to satisfy cravings while fueling your body with protein and fiber.
They also work beautifully as a dessert at gatherings or lunchboxes.
For an indulgent touch, drizzle extra melted chocolate over the bars or pair them with fresh berries or a dollop of coconut yogurt.
Storage Tips: Keep Bars Fresh Longer
To keep your Toasted Coconut Bars fresh, store them in an airtight container in the refrigerator.
They will stay firm and flavorful for up to 5–6 days.
For longer storage, freeze the bars in a single layer, separated by parchment paper, for up to 3 months.
When ready to enjoy, allow them to thaw for 10–15 minutes at room temperature for optimal texture.
Avoid leaving them out at room temperature for too long, as the chocolate topping can soften and lose its shine.
Frequently Asked Questions
1. Can I use other nuts instead of almonds and cashews?
Yes! Feel free to swap in walnuts, pecans, or hazelnuts. Keep the total nut quantity similar (around 125 g) to maintain the proper texture and binding.
2. Can I make these bars without chocolate?
Absolutely. The chocolate layer is optional. The bars are still delicious and chewy without it, though chocolate adds richness and a subtle bitterness that balances the sweetness.
3. Are these bars suitable for meal prep?
Yes! These bars are perfect for meal prep. Store in the fridge or freezer, and they provide a ready-to-eat, high-protein, fiber-rich snack that’s convenient for busy mornings or afternoon cravings.
4. How can I prevent the chocolate from seizing?
Always melt the chocolate gently over a water bath or in short bursts in the microwave, stirring frequently. Avoid any water coming in contact with the chocolate, as even a small drop can cause it to seize.
5. Can I make smaller or larger bars?
Yes, you can cut the bars into any size you like. Just remember that smaller bars may feel sweeter and richer, while larger bars make a more filling snack. Adjust nutrition calculations accordingly if portion size changes.