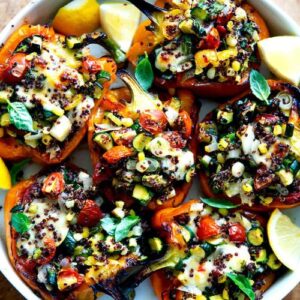
These Veggie-Loaded Stuffed Bell Peppers are a colorful, wholesome twist on a comfort classic.
Packed with quinoa, fresh corn, zucchini, and gooey Monterey Jack cheese, they deliver a perfect balance of flavor and nutrition.
This protein- and fiber-rich meal is low in saturated fat, filled with plant-based goodness, and makes an easy, satisfying option for busy weeknights or make-ahead meal prep.
Veggie Loaded Stuffed Bell Peppers
Equipment
- 1 large baking sheet
- Parchment paper (1 sheet)
- 1 medium saucepan
- 1-Large skillet
- 1 fine-mesh strainer
- 1 wooden spoon or spatula
- 1 sharp knife
- 1 cutting board
Ingredients
- 6 large bell peppers halved and cored (stems optional)
- 2 tablespoons olive oil plus more for drizzling
- ½ cup quinoa uncooked
- 1 medium onion finely diced
- 1 small hot chili pepper minced (optional)
- 1 –2 small zucchini diced (about 2 cups)
- Kernels from 2 ears of corn
- 1 cup cherry tomatoes quartered
- 6 scallions thinly sliced
- 1 cup fresh cilantro chopped
- 12 ounces Monterey Jack cheese cubed
- Salt and black pepper to taste
- Fresh basil or chives finely chopped (for garnish)
- Lemon wedges for serving (optional)
Instructions
- Preheat and Prepare the Oven: Begin by setting your oven to 475°F (245°C) on the convection roast setting. This high heat helps the bell peppers blister beautifully, adding a subtle smoky sweetness and tender texture.Line a large baking sheet with parchment paper to prevent sticking and make cleanup easy. Set it aside while you prepare the peppers.
- Prep the Bell Peppers: Wash and dry 6 large bell peppers thoroughly. Slice each one in half lengthwise from the stem down, keeping the stems intact if you prefer a rustic presentation. Remove all seeds and inner membranes to create clean, hollow cavities perfect for stuffing.Arrange the pepper halves cut-side down on the prepared baking sheet. Drizzle each lightly with olive oil and sprinkle generously with kosher salt. This seasoning layer helps the natural flavors shine through while roasting.
- Roast Until Tender and Blistered: Transfer the baking sheet to your preheated oven and roast the peppers for 15 to 20 minutes, or until the skins begin to blister and soften slightly.You’ll notice some gentle charring along the edges — that’s what gives the peppers their signature roasted flavor. Once done, remove the tray from the oven and carefully flip the peppers cut-side up using tongs. Set them aside to cool while you prepare the filling.
- Cook the Quinoa to Fluffy Perfection: While the peppers roast, bring a medium saucepan of water to a steady simmer over medium-high heat. Add a big pinch of kosher salt to season the water.Stir in ½ cup of quinoa and let it cook for 9 to 12 minutes, or until the grains appear translucent and the little white tails unfurl — a sign that it’s fully cooked.Once done, pour the quinoa into a fine-mesh strainer to drain any excess water. Set aside to let it steam-dry for a few minutes; this helps prevent the filling from becoming watery later.
- Sauté the Aromatics for Flavor: Heat 2 tablespoons of olive oil in a large skillet over medium-high heat until it shimmers. Add the finely diced onion and optional minced chili for a gentle kick. Immediately reduce the heat to medium to avoid burning.Sprinkle a pinch of salt over the onions — this helps draw out their moisture and deepens their sweetness. Cook for about 5 minutes, stirring occasionally, until the onions soften, turn translucent, and release a fragrant aroma.
- Add Fresh Zucchini and Corn: Toss in the diced zucchini, stirring to coat it evenly in the oil and aromatics. Sauté for about 2 minutes, just long enough for it to lose its raw edge while staying crisp and vibrant. Avoid overcooking — a little texture gives the filling body and freshness.Next, add the corn kernels and continue cooking for another minute, stirring constantly. The corn should become bright yellow and lightly fragrant without browning.
- Fold in Fresh Vegetables and Herbs: Turn off the heat to preserve the freshness of your final ingredients. Stir in the cherry tomatoes, sliced scallions, and chopped cilantro. These ingredients add bursts of color, freshness, and a light, herby flavor that balances the rich cheese you’ll add later.The heat from the skillet will slightly soften the tomatoes without making them mushy, creating a perfect contrast in textures.
- Combine with Quinoa and Season Well: Add the cooked quinoa to the skillet and gently fold everything together until evenly mixed. The quinoa will soak up the juices and flavors from the vegetables, creating a cohesive filling.Season with salt and freshly ground black pepper to taste. Be generous — a well-seasoned filling is key to perfectly flavorful stuffed peppers.Once you’re happy with the flavor, add the cubed Monterey Jack cheese and fold it in just enough to distribute it evenly through the mixture.
- Fill the Roasted Bell Peppers: Spoon the warm filling into each roasted pepper half, pressing it down gently so it’s well-packed. Don’t worry about mounding the mixture high — the filling should be heaped and abundant, giving each pepper a hearty, satisfying appearance.If you have leftover filling, save it for later; it’s delicious served as a warm grain salad or tucked into wraps.
- Bake Until Golden and Melty: Return the stuffed peppers to the oven and roast for an additional 10 minutes, or until the cheese begins to melt and the tops turn golden brown with slightly crisp edges.The vegetables should be tender, and the filling should smell rich and savory. This short bake brings everything together into a cohesive, comforting dish.
- Garnish and Serve: Once the peppers are done, remove them from the oven and let them rest for a few minutes before serving — this allows the flavors to settle.Sprinkle with freshly chopped basil or chives for a touch of color and herbal brightness. If you enjoy a hint of acidity, finish with a light squeeze of fresh lemon juice just before serving.Serve warm as a main course on its own or pair with a crisp side salad, garlic bread, or roasted potatoes for a complete meal.
Notes
- Choose firm, brightly colored bell peppers for the best presentation and flavor; avoid soft or wrinkled ones.
- Use tri-color peppers (red, yellow, and orange) for a vibrant dish with natural sweetness and visual appeal.
- Cook the quinoa until it’s fluffy but not mushy — a light texture blends better with the vegetables.
- Slightly undercook the zucchini during sautéing to keep a pleasant crunch after baking.
- For an extra boost of flavor, mix in a dash of smoked paprika or cumin to the filling.
- You can easily swap Monterey Jack for mozzarella, pepper jack, or vegan cheese alternatives.
- The filling can be made a day ahead and refrigerated; just fill and bake the peppers before serving.
- A squeeze of fresh lemon or lime juice adds brightness and balances the cheesy richness.
Chef’s Secrets for Perfect Stuffed Peppers
The secret to achieving restaurant-quality stuffed bell peppers lies in balancing texture, seasoning, and moisture.
Roasting the peppers cut-side down first helps soften their flesh while allowing a slight blistering that deepens flavor.
It’s important not to overcook the zucchini and corn — keeping them slightly crisp ensures the filling doesn’t become soggy once baked.
When seasoning, taste the quinoa mixture before adding cheese; this allows you to adjust the salt and spice level precisely.
Using cubed cheese instead of shredded creates little pockets of melty richness instead of a uniform layer, making every bite uniquely satisfying.
Finally, let the peppers rest for a few minutes after baking — this short pause helps the filling firm up, making them easier to serve without collapsing.
Serving Suggestions for Every Occasion
These stuffed bell peppers are incredibly versatile and can be served as a standalone entrée or hearty side dish.
For a balanced meal, pair them with a crisp green salad with lemon vinaigrette, garlic roasted potatoes, or a bowl of tomato soup.
They also pair beautifully with grilled proteins such as shrimp, tofu, or chicken for a mixed-plate dinner.
If you’re entertaining, arrange the peppers on a platter and garnish with fresh herbs and lemon wedges for a colorful, crowd-pleasing presentation.
For a lighter lunch option, serve half a pepper alongside quinoa salad or roasted vegetables.
The dish also travels well, making it a great option for lunchboxes, meal prep, or picnic-style dinners.
Storage Tips to Keep Them Fresh
Allow the stuffed peppers to cool completely before storing.
Place them in an airtight container and refrigerate for up to 4 days.
If stacking layers, separate them with parchment paper to prevent sticking.
For longer storage, you can freeze the baked peppers — simply wrap each half tightly in foil or plastic wrap, then place them in a freezer-safe bag.
They’ll keep well for up to 2 months.
To reheat, thaw in the refrigerator overnight and warm in a 350°F oven for about 15 minutes, or until heated through.
Avoid microwaving directly from frozen, as it can make the peppers watery and unevenly heated.
The filling also stores well separately; use leftovers in wraps, burrito bowls, or as a base for grain salads.
Frequently Asked Questions
1. Can I make these peppers vegan?
Absolutely! Simply substitute Monterey Jack cheese with a vegan melting cheese or nutritional yeast for a savory touch.
Ensure your quinoa and vegetable mixture is well-seasoned to enhance depth of flavor. You can also add black beans or chickpeas for extra plant-based protein.
2. What type of quinoa works best?
Any variety — white, red, or tricolor quinoa — works beautifully here. White quinoa gives a mild, fluffy texture, while red or tricolor quinoa adds a bit more chew and a nutty taste.
Just remember to rinse the quinoa well before cooking to remove bitterness.
3. Can I prepare the peppers ahead of time?
Yes, this recipe is meal-prep friendly. You can roast the peppers and prepare the filling up to a day in advance.
Store them separately in the refrigerator, then assemble and bake just before serving for the freshest flavor and best texture.
4. What other vegetables can I add?
This recipe is wonderfully adaptable. Try mixing in mushrooms, spinach, diced carrots, or kale for extra color and nutrition.
Avoid watery vegetables like tomatoes when adding raw, as they can thin the filling — instead, roast or sauté them first to reduce moisture.
5. How can I make the filling more protein-rich?
To increase protein, add black beans, chickpeas, edamame, or diced tofu to the filling. You can also sprinkle toasted nuts or seeds like pumpkin or sunflower seeds on top for a nutritious crunch.
These additions make the meal even more filling without compromising its light, healthy appeal.