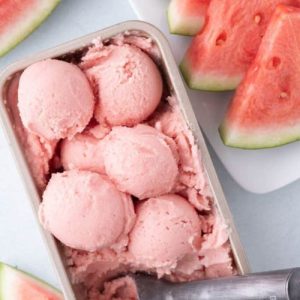
Cool, creamy, and naturally sweet, this Watermelon Ice Cream is the ultimate no-churn summer treat that requires just three ingredients.
Packed with hydrating watermelon and balanced with a touch of condensed milk, it’s a refreshing dessert that feels indulgent without being heavy.
Each serving provides a light boost of protein and calcium, making it a healthier option than traditional ice cream.
Quick to prepare, it’s ideal for everyday enjoyment or make-ahead desserts.
Watermelon Ice Cream
Equipment
- 1 blender or food processor
- 1 Loaf pan (9×5 inch or similar)
- 1 Baking sheet, lined with parchment paper
Ingredients
- 7 –8 cups watermelon cut into large cubes
- 14 oz can sweetened condensed milk
- 1 pinch salt
Instructions
- Prepare and Freeze the Watermelon: Start by cutting your fresh watermelon into large, uniform cubes. Aim to keep them roughly the same size so they freeze evenly, which helps your blender work more efficiently later. As you cube the fruit, be sure to remove any black seeds, since they can affect both texture and flavor. Once the pieces are ready, spread them out in a single layer on a parchment-lined baking sheet. This prevents the cubes from sticking together and makes blending much easier. Place the tray in the freezer for at least 3 hours, or until the watermelon is completely solid. This frozen base is what gives the ice cream its naturally thick, creamy texture.
- Blend the Ice Cream Base: After your watermelon cubes are frozen, transfer them directly into a high-powered blender or a food processor. Add the entire can of sweetened condensed milk and sprinkle in a pinch of salt. The condensed milk brings creamy richness and sweetness, while the salt subtly enhances the flavor of the melon. Begin blending on a low setting, then gradually increase the speed until the mixture becomes smooth and creamy. Depending on your blender, you may need to pause occasionally to scrape down the sides and ensure all the cubes are fully incorporated. The goal is a velvety mixture with no chunks remaining. If your blender generates heat and the mixture softens a little, don’t worry—this is normal. You’ll just need to extend the freezing time in the next step.
- Transfer and Freeze the Mixture: Once blended to perfection, pour the silky mixture into a loaf pan or freezer-safe container. Use a spatula to smooth the top, ensuring it’s spread evenly for consistent freezing. Cover the container with plastic wrap or a fitted lid to prevent ice crystals from forming on the surface. Place the pan in the freezer for at least 1 hour, or until the ice cream firms up enough to scoop. If you prefer a softer, soft-serve-like texture, you can enjoy it sooner, but for a more traditional ice cream scoop, waiting a bit longer is best.
- Scoop and Serve with Ease: When you’re ready to enjoy your homemade watermelon ice cream, remove the container from the freezer. If it has been frozen for more than 3 hours, the texture will be quite firm. Simply let it sit at room temperature for about 5–10 minutes before scooping. This quick rest softens the ice cream slightly, making it easier to scoop into neat, rounded servings. Use an ice cream scoop or sturdy spoon, and serve in chilled bowls, cones, or even layered in parfait glasses for a fancier presentation. The result is a refreshing, naturally sweet, and creamy treat that highlights the pure flavor of watermelon.
- Store Leftovers Properly: If you have leftovers, keep the ice cream covered tightly in the freezer for up to 2 weeks. Because it hardens the longer it sits, simply leave it out for several minutes before scooping again. For best flavor and texture, enjoy it within the first few days when the melon’s natural sweetness is at its peak.
Notes
- Cut watermelon into even-sized cubes to ensure they freeze uniformly.
- Remove all black seeds for a smooth blend and better flavor.
- Use parchment paper on the tray to prevent the cubes from sticking.
- A pinch of salt enhances the natural sweetness of watermelon.
- If your blender warms the mixture, freeze the base a little longer before serving.
- Allow the ice cream to rest at room temperature for 5–10 minutes before scooping for the perfect creamy texture.
- Store leftovers tightly covered to avoid freezer burn.
- Enjoy within two weeks for the best flavor and consistency.
Chef’s Secrets for Perfect Texture
The key to irresistibly creamy no-churn watermelon ice cream lies in how you prepare and freeze the fruit.
Always freeze the watermelon cubes individually on a tray before blending—this prevents clumping and makes it easier on your blender.
Sweetened condensed milk provides both creaminess and stability, eliminating the need for extra ingredients like heavy cream.
If you find your blender struggles, add a splash of condensed milk at a time rather than all at once.
Finally, patience is essential; letting the ice cream soften slightly before scooping ensures the texture is scoopable and not icy.
Serving Suggestions for Extra Enjoyment
This ice cream shines on its own, but it’s also versatile for creative pairings.
Scoop it into waffle cones for a nostalgic summer feel, or layer it in parfait glasses with fresh berries and granola for a healthier twist.
For a tropical flair, top with shredded coconut, a drizzle of honey, or a sprinkle of lime zest.
It also pairs beautifully with a platter of fresh fruit or light shortbread cookies.
If you’re entertaining, serve it in hollowed-out mini watermelon bowls for a playful and eye-catching presentation.
Storage Tips for Lasting Freshness
To keep your watermelon ice cream at its best, store it in a freezer-safe container with a tight-fitting lid or wrap it securely with plastic wrap.
This prevents freezer burn and helps preserve the flavor.
While it will stay safe to eat for up to two weeks, the texture is creamiest when enjoyed within the first few days.
If it becomes too firm, allow the container to sit on the counter for 5–10 minutes before scooping.
Avoid frequent thawing and refreezing, as this can lead to ice crystals and a grainy texture.
Frequently Asked Questions
1. Can I make this recipe dairy-free?
Yes! Simply swap the sweetened condensed milk with a dairy-free alternative like coconut condensed milk. It adds a subtle coconut flavor while keeping the creamy consistency.
2. Do I need an ice cream maker?
Not at all. This recipe is completely no-churn, meaning your blender or food processor does all the work. No fancy equipment required.
3. Can I use pre-cut or store-bought frozen watermelon?
You can, but fresh watermelon cubes tend to deliver a sweeter, more vibrant flavor. If using pre-cut frozen, ensure it’s seedless and adjust sweetness if needed.
4. Why does the ice cream get so hard in the freezer?
Since this recipe doesn’t include stabilizers, it naturally firms up after several hours. The solution is simple—let it rest on the counter for a few minutes before scooping.
5. Can I add extra mix-ins like chocolate chips or fruit?
Absolutely! Mini chocolate chips, chopped strawberries, or crushed cookies can be folded into the mixture after blending for extra texture and flavor.