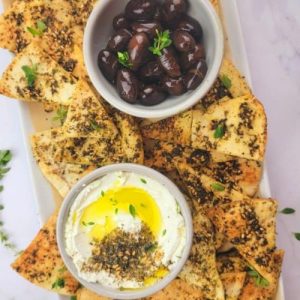
Crispy, golden, and bursting with aromatic za’atar, these homemade pita chips are the perfect snack or appetizer.
Packed with fiber from whole grains and heart-healthy fats from olive oil, they make a wholesome, plant-based treat.
Quick to prepare and easy to customize, these chips are ideal for satisfying cravings, pairing with dips, or adding crunch to everyday meals.
Zaatar Pita Chips
Equipment
- 1 Baking sheet, lined with parchment paper
- Kitchen scissors
- Large Mixing Bowl
- Spoon or Tongs (for tossing)
- Oven
Ingredients
- 2 large pita breads white or whole wheat
- 2 tablespoons extra virgin olive oil
- 3 tablespoons za’atar spice
Instructions
- Prepare Your Oven and Baking Sheet: Begin by preheating your oven to 350°F (175°C). While the oven warms, line a baking sheet with parchment paper. To ensure your pita chips do not stick and come out crisp, lightly spray the parchment with cooking spray or brush a thin layer of olive oil. Set the prepared sheet aside so it’s ready when your pita is coated.
- Cut Pita Bread Into Triangles: Take your pita bread and, using a pair of kitchen scissors, carefully cut each piece into even triangular shapes. Aim for uniform sizes so that all pieces bake at the same rate, ensuring a consistent golden crunch. For visual appeal and even baking, you can cut each pita into 6–8 triangles depending on the size of your bread.
- Drizzle with Olive Oil: Place all the cut pita triangles into a large mixing bowl. Drizzle the olive oil evenly over the pieces. Use a spoon or clean hands to gently toss the pita, making sure each triangle is lightly coated. This step is essential for helping the za’atar spice stick and for creating a crisp, golden texture during baking.
- Season with Zaatar Spice: Sprinkle the za’atar evenly over the oiled pita triangles. Toss again until each piece is generously but evenly coated with the fragrant spice mixture. Take a moment to enjoy the aromatic scent of the za’atar—it adds a delicious, earthy flavor that makes these chips so irresistible.
- Arrange on the Baking Sheet: Spread the seasoned pita triangles in a single, even layer on the prepared baking sheet. Avoid overlapping pieces, as this can prevent them from baking evenly and achieving that perfect crunch. Make sure each triangle has a little space around it so heat circulates properly.
- Bake Until Golden and Crispy: Place the baking sheet in the preheated oven. Bake the pita chips for 10–12 minutes, keeping a close eye on them after the 8-minute mark. They should turn a light golden brown and become crisp to the touch. Ovens vary, so adjust the time slightly if needed to prevent burning. For extra crunch, you can flip the triangles halfway through baking.
- Cool Slightly Before Serving: Once baked, remove the tray from the oven and allow the pita chips to cool for 2–3 minutes. This short resting period helps them firm up and enhances their crunchiness. While still slightly warm, they are perfect for dipping or snacking.
- Serve and Enjoy: Transfer the chips to a serving bowl or platter. Pair with your favorite dips like hummus, baba ganoush, or tzatziki for a flavorful snack. These chips are best enjoyed fresh but can also be stored for later use.
Notes
- Use fresh pita bread for the best texture; slightly stale pita can also work but may require careful baking to avoid burning.
- Cutting the triangles evenly ensures uniform baking, preventing some pieces from becoming overdone while others remain soft.
- Olive oil not only helps the za’atar stick but also promotes a golden, crispy finish. Don’t skip this step.
- Keep a close eye on the chips in the last few minutes of baking, as they can go from golden to burnt very quickly.
- Experiment with za’atar blends from different brands or regions for subtle flavor variations, adjusting the amount to your taste.
Chef’s Secrets for Perfect Crunch
Achieving perfectly crispy pita chips requires a combination of technique and timing.
Always preheat your oven to the correct temperature to allow even baking.
Use a light, uniform coating of olive oil; too much can make the chips greasy, while too little prevents the za’atar from adhering.
Spacing the triangles evenly on the baking sheet is essential for consistent heat circulation, which ensures each chip crisps evenly.
For an extra touch, consider flipping the chips halfway through baking to guarantee a golden finish on both sides.
Finally, cooling them for a few minutes after baking enhances their crunch, making them satisfyingly crisp when you bite into them.
Serving Suggestions for Maximum Enjoyment
These za’atar pita chips are incredibly versatile.
Serve them warm with classic dips like hummus, tzatziki, baba ganoush, or a simple olive tapenade.
They also pair beautifully with cheese plates, charcuterie boards, or fresh vegetable platters for parties and casual gatherings.
For a creative twist, sprinkle them over salads for added crunch or use as a base for mini appetizers by topping them with roasted vegetables, avocado, or labneh.
Their bold, herby flavor makes them a standout snack on their own or an accompaniment to virtually any Mediterranean-inspired meal.
Storage Tips for Long-Lasting Chips
To maintain crispness, store cooled pita chips in an airtight container at room temperature.
They typically stay fresh for up to one week.
Avoid storing them in the refrigerator, as this can make them lose their crunch.
For longer-term storage, you can freeze baked chips in a sealed freezer-safe bag for up to one month.
When ready to eat, simply reheat in a preheated oven at 325°F (160°C) for 3–5 minutes to restore their crisp texture.
Always ensure chips are fully cooled before sealing in containers to prevent moisture buildup, which can make them soggy.
Frequently Asked Questions
1. Can I use whole wheat pita bread?
Absolutely! Whole wheat pita adds extra fiber and a nuttier flavor to the chips. Just ensure the triangles are evenly cut and bake as directed; they may take a minute or two longer to crisp.
2. Can I make these pita chips without olive oil?
Olive oil is recommended for flavor and crispness, but you can lightly spray or brush the chips with a neutral oil if preferred. Keep in mind that chips may not brown as evenly without oil.
3. How do I prevent pita chips from burning?
Cut all triangles to a similar size, bake on a single layer, and watch closely during the final 3 minutes. Oven temperatures vary, so checking frequently ensures a golden, not burnt, result.
4. Can I add other spices or flavors?
Yes! Zaatar is traditional, but you can experiment with garlic powder, smoked paprika, sumac, or sesame seeds. Toss spices evenly with the oil before baking for balanced flavor.
5. Are these chips suitable for meal prep or snacking?
Definitely. They are quick to make, store well in an airtight container, and provide a satisfying, fiber-rich snack. Perfect for pairing with dips, adding to salads, or packing for on-the-go munching.