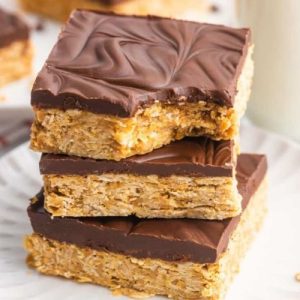
These Chocolate Peanut Butter Oatmeal Bars are a perfect blend of indulgence and nutrition.
Packed with plant-based protein, fiber-rich oats, and heart-healthy fats from peanut butter, they make a wholesome snack or quick breakfast option.
Easy to prepare and naturally sweetened, they’re a satisfying treat that’s ideal for meal prep, energy boosts, or guilt-free dessert cravings.
Chocolate Peanut Butter Oatmeal Bars
Equipment
- 9×9 inch baking pan
- Parchment Paper
- Mixing bowl
- Measuring Cups and Spoons
- spatula
- Microwave-safe bowl
Ingredients
Peanut Butter Oat Base:
- 1½ cups 360 g creamy peanut butter
- ⅓ cup 80 ml maple syrup or honey
- 1½ cups 150 g old-fashioned oats
- 1 teaspoon pure vanilla extract
Chocolate Topping:
- 1½ cups 270 g dark chocolate chips
- ¼ cup 60 g creamy peanut butter
Instructions
- Prepare the Pan and Tools: Begin by greasing a 9×9-inch baking pan lightly with coconut oil or non-stick spray to ensure the bars don’t stick. Then line the pan with parchment paper, allowing excess paper to overhang on two sides. This will make removing the bars easier later. Arrange all tools you will need, including a microwave-safe mixing bowl, measuring cups, spoons, a mixing bowl for the topping, and a spatula. Having everything prepared before starting will make the process smooth and stress-free.
- Melt the Peanut Butter: Place 1½ cups of creamy peanut butter into a microwave-safe bowl. Heat it in 30-second bursts, stirring thoroughly after each interval until smooth and slightly runny. Melting slowly and stirring between intervals will help avoid overheating and preserve the peanut butter’s creamy texture. Once melted, remove from the microwave and set aside for mixing.
- Mix the Base Ingredients: To the melted peanut butter, add ⅓ cup of maple syrup or honey, stirring well to combine evenly. Then add 1½ cups of old-fashioned oats and 1 teaspoon of pure vanilla extract. Use a spatula to fold the mixture until all ingredients are fully incorporated. The mixture should be sticky, cohesive, and textured with oats evenly distributed throughout. This step ensures the base layer holds together after chilling.
- Press the Base Layer: Transfer the peanut butter oat mixture into the prepared pan. Use a spatula to press the mixture firmly and evenly into the bottom. Apply consistent pressure to create a compact and uniform layer. A smooth surface will make applying the chocolate topping easier and create an attractive finish. This step is essential to ensure the bars cut cleanly and hold together well.
- Prepare the Chocolate Topping: In a separate microwave-safe bowl, combine 1½ cups of dark chocolate chips with ¼ cup of creamy peanut butter. Heat the mixture in 30-second intervals, stirring after each burst until fully melted and smooth. Stir gently to blend the peanut butter evenly into the chocolate. This will create a glossy, rich topping that enhances both flavor and texture.
- Spread the Chocolate Topping: Pour the melted chocolate mixture over the pressed peanut butter oat base. Use a spatula to spread it evenly across the surface. To make the bars visually appealing, use a toothpick or skewer to create swirls or patterns. This decorative touch adds a professional look while keeping preparation simple.
- Chill Until Firm: Place the pan in the refrigerator for at least two hours to allow the bars to set completely. Chilling enhances the flavor and texture of the bars while making cutting easier later. Cover loosely with plastic wrap to prevent the bars from absorbing other fridge odors.
- Cut and Serve: Once firm, remove the pan from the refrigerator and let it rest at room temperature for about 15 minutes. Lift the block of bars from the pan using the parchment paper overhang and transfer to a cutting board. Use a sharp knife to cut into your desired portion size — anywhere from nine large squares to eighteen smaller bars. This flexibility makes the recipe perfect for portion control or sharing.
- Store for Freshness: Transfer the bars into an airtight container. Keep refrigerated for up to one week, or freeze for up to three months. If frozen, allow bars to thaw at room temperature for about 10–15 minutes before serving. Warming them slightly in the microwave enhances their flavor and texture for a soft, indulgent treat.
- Serve and Enjoy: These bars make a great grab-and-go snack, wholesome breakfast, or a guilt-free dessert. Pair them with fresh fruit, yogurt, coffee, or a smoothie for a complete treat. They’re also excellent for lunchboxes, picnics, or energy boosts before workouts. Enjoy them anytime you crave a combination of rich chocolate, creamy peanut butter, and wholesome oats.
Notes
- For best texture, use old-fashioned rolled oats, not instant oats, as they give the bars a chewy, satisfying bite.
- Maple syrup or honey works equally well; maple syrup gives a subtle earthy sweetness, while honey adds a floral note.
- Ensure peanut butter is creamy for smooth mixing; natural peanut butter with oil separation should be stirred before use.
- Cutting bars after they’ve rested at room temperature ensures clean edges and prevents crumbling.
- These bars can easily be doubled for larger batches; adjust the pan size accordingly for consistent thickness.
Chef’s Secrets: Perfect Bar Texture Every Time
Creating the ideal balance of texture and flavor in these bars comes down to technique.
Pressing the peanut butter oat base firmly into the pan ensures the bars hold together and won’t crumble when cut.
Gently melting the chocolate topping in short increments keeps it smooth and glossy while preserving flavor.
Swirling with a toothpick adds a professional touch without extra effort.
Using high-quality dark chocolate enhances flavor depth, while adding a pinch of sea salt to the topping brings a delightful contrast to the sweetness.
For a richer variation, stir in finely chopped nuts, coconut flakes, or chia seeds into the base layer for added texture and nutritional benefits.
Serving Suggestions: Delicious Ways To Enjoy
These chocolate peanut butter oatmeal bars are versatile and can be enjoyed in many ways.
Serve them as a wholesome breakfast paired with Greek yogurt or fresh fruit for a balanced morning meal.
As a snack, they pair beautifully with a cold glass of almond milk or a hot cup of coffee.
They also make a great dessert — especially when topped with a dollop of whipped coconut cream or a drizzle of additional peanut butter.
Perfect for lunchboxes, they’re a crowd-pleasing option for picnics, road trips, or afternoon energy boosts.
Storage Tips: Keep Bars Fresh Longer
To maintain freshness and flavor, store bars in an airtight container in the refrigerator for up to one week.
This keeps the texture firm while preserving the chocolate topping’s glossy finish.
For longer storage, place bars in a freezer-safe container layered with parchment paper to prevent sticking, and freeze for up to three months.
To enjoy frozen bars, allow them to thaw at room temperature for about 10–15 minutes before eating.
You can also warm them slightly in the microwave for a soft, gooey treat.
Frequently Asked Questions
1. Can I make these bars vegan?
Yes! Simply use maple syrup instead of honey and ensure your chocolate chips are dairy-free.
You can also choose a plant-based peanut butter option to keep the recipe completely vegan while maintaining flavor and texture.
2. Can I substitute oats with something else?
While old-fashioned oats give the best texture, you can substitute with gluten-free oats for a gluten-free version. Quinoa flakes or crushed puffed rice can also work but will change the texture slightly.
3. How do I make these bars nut-free?
To make a nut-free version, substitute peanut butter with sunflower seed butter or soy nut butter. Ensure the chocolate you use is also nut-free to avoid allergens.
4. Can I make these bars ahead of time?
Absolutely! These bars store beautifully and taste even better after resting. Prepare them up to two days in advance and store chilled for easy grab-and-go snacks throughout the week.
5. Can I add extra flavors or mix-ins?
Definitely! Try adding shredded coconut, chia seeds, flax seeds, chopped nuts, or dried fruit to the base layer for extra texture and flavor.
A sprinkle of sea salt on top of the chocolate layer can also enhance the sweetness and add depth.