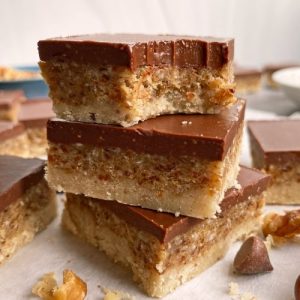
These no-bake walnut date bars are a delicious, wholesome treat that combines naturally sweet dates, crunchy walnuts, and a rich chocolate topping.
Packed with plant-based protein, fiber, and healthy fats, they are low in refined sugar and perfect for a quick snack or breakfast on-the-go.
Simple, satisfying, and meal-prep friendly, they are ideal for everyday healthy indulgence.
Healthy Walnut Date Bars
Equipment
- Food processor (1)
- 8" x 8" baking pan (1)
- Small saucepan (1)
- Spatula (1)
- Measuring cups and spoons – as needed
- Lined parchment paper (for pan)
Ingredients
Crust:
- ½ cup 60g coconut flour
- ½ cup 55g walnut halves
- ⅛ tsp salt
- 3 Tbsp coconut oil room temperature
- 1 Tbsp raw honey or maple syrup for vegan
- 1 tsp vanilla extract
Filling:
- 125 g Medjool dates pitted (about 8-10 dates)
- 1 cup 110g walnut halves
- ½ cup 50g unsweetened shredded coconut
- Pinch of salt
Topping:
- 2 oz dark chocolate
- ⅓ cup almond butter soft/drippy
Instructions
- Prepare the Baking Pan: Line an 8" x 8" baking pan with parchment paper, making sure the paper covers both the bottom and sides with a slight overhang. This will make it easy to lift the bars out once set. Set the pan aside while you prepare the crust.
- Make the Crust Mixture: In a food processor or high-powered blender, combine ½ cup coconut flour, ½ cup walnut halves, and ⅛ teaspoon salt. Add 3 tablespoons of room-temperature coconut oil, 1 tablespoon honey (or maple syrup for vegan), and 1 teaspoon vanilla extract. Pulse in short bursts, stopping occasionally to scrape down the sides. Blend until the mixture starts to clump into a soft, slightly sticky dough that holds together when pressed.
- Press the Crust Into the Pan: Transfer the crust mixture to the prepared pan. Using your hands or the back of a spoon, firmly press the dough evenly across the bottom, forming a compact, uniform layer with no gaps. A firmly pressed crust ensures the bars hold together properly after chilling.
- Prepare the Filling Mixture: Add 125g pitted Medjool dates, 1 cup walnut halves, ½ cup unsweetened shredded coconut, and a pinch of salt into a clean food processor. Blend until the mixture starts to come together and clumps. Scrape the sides as needed to ensure even blending. The filling should be sticky enough to spread evenly over the crust.
- Layer the Filling Over the Crust: Remove the filling mixture from the processor and evenly scatter it over the crust. Use clean hands or a spatula to gently press the mixture down, creating a firm, even layer that fully covers the base. This layer should stick together well to prevent crumbling when cut.
- Melt the Chocolate Topping: Place 2 ounces of dark chocolate in a small saucepan over very low heat. Stir continuously as it melts to prevent burning. Once fully melted, remove from heat and stir in ⅓ cup soft, drippy almond butter until smooth and glossy.
- Pour the Topping Over the Filling: Carefully pour the chocolate-almond butter mixture over the date and walnut layer. Use a spatula or the back of a spoon to spread it evenly, reaching all edges. Smooth the surface to create a neat, uniform top layer.
- Chill to Set: Place the pan in the refrigerator for at least 30 minutes to allow the bars to firm up. Chilling is crucial for ensuring clean cuts and maintaining the shape of the bars.
- Cut and Serve: Once set, lift the bars from the pan using the parchment paper overhang. Place them on a cutting board and use a sharp knife to slice into 16 equal bars. Wipe the knife clean between cuts for cleaner edges. Serve immediately or store for later enjoyment.
Notes
- Use Medjool dates for best natural sweetness and soft texture; they help bind the bars without added sugar.
- Press crust and filling firmly to ensure bars hold together when sliced.
- Melt chocolate gently over low heat to prevent burning or seizing.
- Chill bars fully before cutting for clean, neat edges.
- For a vegan version, replace honey with maple syrup and use dairy-free chocolate.
- Lightly toast walnuts before blending to enhance flavor and add crunch.
- Use parchment paper in the pan for easy removal and to maintain bar shape.
- Bars can be stored in an airtight container in the fridge or frozen for longer shelf life.
Chef’s Secrets For Perfect Bars
To achieve the ideal texture, toast the walnut halves lightly in a dry pan for a few minutes before using them in the crust or filling.
This enhances their natural flavor and adds a subtle crunch.
When blending the filling, pulse slowly and intermittently to retain small walnut pieces, giving the bars a more interesting bite.
For a glossy chocolate topping, add a small splash of coconut oil to the chocolate-almond butter mixture before pouring it over the filling.
Using parchment paper in the pan is a simple trick that makes lifting the bars out effortless, ensuring they maintain their shape.
Serving Suggestions For Everyday Enjoyment
These bars are wonderfully versatile.
Serve them as a grab-and-go breakfast with a cup of coffee, or as an afternoon snack to keep energy levels steady.
They also make a satisfying post-workout treat thanks to their balance of healthy fats, protein, and natural sugars.
Pair them with fresh fruit or a small dollop of yogurt for added freshness.
For special occasions, cut them into smaller squares and drizzle extra melted chocolate on top for a polished presentation.
Storage Tips To Keep Fresh
For best results, store the bars in an airtight container in the refrigerator for up to one week.
If you’d like to enjoy them longer, they freeze beautifully—wrap individual bars in parchment or plastic wrap and place them in a freezer-safe container for up to three months.
Thaw frozen bars in the fridge or at room temperature before serving.
Avoid leaving them at room temperature for long periods, especially in warm climates, as the chocolate topping may soften and compromise their structure.
Frequently Asked Questions
1. Can I make these bars nut-free?
Yes! Replace the walnuts with seeds such as sunflower, pumpkin, or a mix of your favorite nut-free alternatives. Keep in mind that texture and flavor may slightly differ, but the bars will still hold together.
2. Are these bars suitable for vegans?
Absolutely. Use maple syrup instead of honey and ensure the chocolate is dairy-free. All other ingredients are plant-based, making this recipe naturally vegan-friendly.
3. How can I make the chocolate topping shinier?
Adding a teaspoon of coconut oil or almond butter while melting the chocolate will give it a glossy finish and smoother texture. Stir continuously over low heat to prevent scorching.
4. Can I use other types of dates?
Medjool dates are recommended for their softness and sweetness, but you can experiment with Deglet Noor or other varieties. If using firmer dates, soak them in warm water for 10 minutes to soften before blending.
5. What’s the best way to cut the bars cleanly?
Chill the bars thoroughly before slicing. Use a sharp knife, wiping it clean between cuts, and press firmly but gently. For extra precision, dip the knife in hot water and dry it before slicing to create smoother edges.