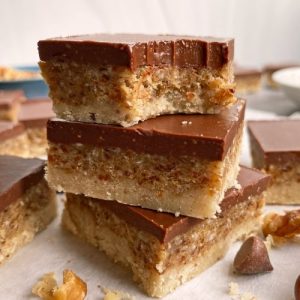
Healthy Walnut Date Bars
Soft, chewy, and chocolatey, these no-bake walnut date bars are a healthy, plant-based snack or dessert. They combine a crumbly shortbread crust, nutty date filling, and a fudgy chocolate topping, delivering protein, fiber, and good fats in every bite. Quick to prepare and perfect for meal prep or a guilt-free treat.
Equipment
- Food processor (1)
- 8" x 8" baking pan (1)
- Small saucepan (1)
- Spatula (1)
- Measuring cups and spoons – as needed
- Lined parchment paper (for pan)
Ingredients
Crust:
- ½ cup 60g coconut flour
- ½ cup 55g walnut halves
- ⅛ tsp salt
- 3 Tbsp coconut oil room temperature
- 1 Tbsp raw honey or maple syrup for vegan
- 1 tsp vanilla extract
Filling:
- 125 g Medjool dates pitted (about 8-10 dates)
- 1 cup 110g walnut halves
- ½ cup 50g unsweetened shredded coconut
- Pinch of salt
Topping:
- 2 oz dark chocolate
- ⅓ cup almond butter soft/drippy
Instructions
- Prepare the Baking Pan: Line an 8" x 8" baking pan with parchment paper, making sure the paper covers both the bottom and sides with a slight overhang. This will make it easy to lift the bars out once set. Set the pan aside while you prepare the crust.
- Make the Crust Mixture: In a food processor or high-powered blender, combine ½ cup coconut flour, ½ cup walnut halves, and ⅛ teaspoon salt. Add 3 tablespoons of room-temperature coconut oil, 1 tablespoon honey (or maple syrup for vegan), and 1 teaspoon vanilla extract. Pulse in short bursts, stopping occasionally to scrape down the sides. Blend until the mixture starts to clump into a soft, slightly sticky dough that holds together when pressed.
- Press the Crust Into the Pan: Transfer the crust mixture to the prepared pan. Using your hands or the back of a spoon, firmly press the dough evenly across the bottom, forming a compact, uniform layer with no gaps. A firmly pressed crust ensures the bars hold together properly after chilling.
- Prepare the Filling Mixture: Add 125g pitted Medjool dates, 1 cup walnut halves, ½ cup unsweetened shredded coconut, and a pinch of salt into a clean food processor. Blend until the mixture starts to come together and clumps. Scrape the sides as needed to ensure even blending. The filling should be sticky enough to spread evenly over the crust.
- Layer the Filling Over the Crust: Remove the filling mixture from the processor and evenly scatter it over the crust. Use clean hands or a spatula to gently press the mixture down, creating a firm, even layer that fully covers the base. This layer should stick together well to prevent crumbling when cut.
- Melt the Chocolate Topping: Place 2 ounces of dark chocolate in a small saucepan over very low heat. Stir continuously as it melts to prevent burning. Once fully melted, remove from heat and stir in ⅓ cup soft, drippy almond butter until smooth and glossy.
- Pour the Topping Over the Filling: Carefully pour the chocolate-almond butter mixture over the date and walnut layer. Use a spatula or the back of a spoon to spread it evenly, reaching all edges. Smooth the surface to create a neat, uniform top layer.
- Chill to Set: Place the pan in the refrigerator for at least 30 minutes to allow the bars to firm up. Chilling is crucial for ensuring clean cuts and maintaining the shape of the bars.
- Cut and Serve: Once set, lift the bars from the pan using the parchment paper overhang. Place them on a cutting board and use a sharp knife to slice into 16 equal bars. Wipe the knife clean between cuts for cleaner edges. Serve immediately or store for later enjoyment.
Notes
- Use Medjool dates for best natural sweetness and soft texture; they help bind the bars without added sugar.
- Press crust and filling firmly to ensure bars hold together when sliced.
- Melt chocolate gently over low heat to prevent burning or seizing.
- Chill bars fully before cutting for clean, neat edges.
- For a vegan version, replace honey with maple syrup and use dairy-free chocolate.
- Lightly toast walnuts before blending to enhance flavor and add crunch.
- Use parchment paper in the pan for easy removal and to maintain bar shape.
- Bars can be stored in an airtight container in the fridge or frozen for longer shelf life.
