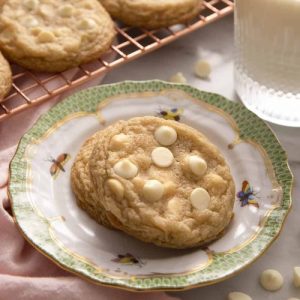
20-Minute White Chocolate Chip Cookies
Soft, buttery, and perfectly chewy, these white chocolate chip cookies are quick to make and guaranteed to satisfy your sweet tooth. With golden edges, creamy white chocolate, and a melt-in-your-mouth texture, they’re a bakery-style cookie made simple at home.
Equipment
- 2 Large baking sheets
- 1 Stand mixer or hand mixer
- 1 mixing bowl
- 1 whisk
- 1 cookie scoop (2-tablespoon size)
- 1 silicone baking mat or parchment paper
- 1 Wire Cooling Rack
Ingredients
- 2 ¼ cups 270 g all-purpose flour
- ½ teaspoon 3 g baking soda
- ¾ teaspoon 4 g salt
- 1 cup 230 g unsalted butter, room temperature
- ½ cup 100 g granulated sugar
- 1 cup 200 g packed light brown sugar
- 2 teaspoons 10 ml pure vanilla extract
- 2 large eggs
- 2 cups 300 g white chocolate chips, divided
Instructions
- Preheat and Prepare the Baking Sheets: Begin by setting your oven to 360°F (182°C). Preheating is important because a consistent temperature ensures the cookies spread properly and bake evenly. While the oven warms up, line two large baking sheets with either parchment paper or silicone baking mats. This step prevents sticking, makes cleanup easier, and helps your cookies bake with smooth bottoms.
- Whisk the Dry Ingredients Together: In a medium mixing bowl, combine the flour, baking soda, and salt. Use a whisk to mix them thoroughly, making sure the baking soda and salt are evenly distributed throughout the flour. This prevents clumps of leavening or uneven seasoning in your dough. Set this bowl aside until needed.
- Cream the Butter and Sugars: Place the softened butter into the bowl of a stand mixer fitted with a paddle attachment (or a large bowl if you’re using a hand mixer). Beat on medium-high speed until smooth and creamy. Gradually add in the granulated sugar, and continue mixing until the mixture looks light and fluffy, about 2 minutes. This step incorporates air, which contributes to the cookies’ chewy texture. Next, add the light brown sugar, and beat again until everything is well-blended, resulting in a soft, pale, and slightly fluffy mixture.
- Incorporate the Eggs and Vanilla: Crack the eggs one at a time into the bowl. Beat well after each addition to fully incorporate and prevent streaks of egg from remaining in the dough. Scrape down the sides of the bowl with a spatula to ensure everything is evenly mixed. Once the eggs are blended in, add the vanilla extract, and mix briefly until combined. This step adds both flavor and richness to the dough.
- Combine the Wet and Dry Ingredients: Lower the mixer speed to low and gradually add in the prepared flour mixture. Mix slowly to avoid overworking the dough, which can make cookies tough instead of chewy. Stop mixing as soon as you no longer see large streaks of flour—this helps maintain a soft texture.
- Fold in the White Chocolate Chips: Reserve a small handful of white chocolate chips to use later for topping. Gently fold the remaining chips into the dough using a spatula or the mixer on its lowest speed. Folding ensures the chips are evenly distributed without overmixing the dough.
- Portion and Arrange the Dough: Using a 2-tablespoon cookie scoop (or a regular spoon if you don’t have one), scoop portions of dough and place them on the prepared baking sheets. Leave at least 3 inches of space between each cookie since they will spread as they bake. Proper spacing ensures your cookies bake into individual rounds instead of merging together.
- Bake to Perfection: Place the baking sheet on the center rack of your preheated oven. Bake for about 10 minutes, or until the cookies are lightly golden around the edges but still soft in the center. If you want extra-pretty cookies, remove them from the oven at around 8 minutes, gently press a few reserved white chocolate chips onto the tops, then return them to the oven for another 2–3 minutes. This creates a bakery-style look with visible melty chips on top.
- Cool the Cookies Properly: Once baked, remove the cookies from the oven and let them rest on the baking sheet for about 5 minutes. This step allows them to set and makes them easier to move without breaking apart. Afterward, transfer them carefully to a wire cooling rack and let them cool completely. Cooling prevents sogginess and gives the cookies the perfect chewy texture with crisp edges.
- Serve and Enjoy: Enjoy your freshly baked cookies while they’re still slightly warm and gooey inside, or let them cool completely for a chewier bite. They’re perfect on their own, paired with a glass of milk, or even used as the base for an ice cream sandwich.
Notes
- Always use room-temperature butter for the best creaming—cold butter won’t incorporate properly, and melted butter makes cookies spread too thin.
- Whisking dry ingredients before adding them ensures even distribution of leavening and salt, preventing dense or uneven cookies.
- A cookie scoop helps keep the cookies uniform in size, which makes them bake evenly.
- Reserving a few white chocolate chips to press on top just before the cookies finish baking creates that bakery-style look.
- Cooling the cookies on a wire rack prevents soggy bottoms and allows them to set with the perfect chewy center and crisp edges.
