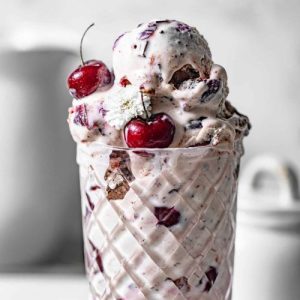
Black Cherry Ice Cream
A creamy, no-churn ice cream bursting with the rich flavor of fresh cherries and swirled with decadent dark chocolate. Quick to prepare and naturally fruity, this black cherry ice cream is a perfect treat for summer days or anytime you want a homemade frozen delight without fuss.
Equipment
- 1 large metal or glass mixing bowl
- 1 small saucepan
- 1 Potato Masher
- 1 hand mixer
- 1 silicone spatula or spoon
- 1 loaf pan (9×5×3 inches) or 8-inch round cake pan
- Plastic wrap
Ingredients
- 1 lb fresh or frozen cherries pitted
- ½ cup granulated sugar
- 1 tbsp fresh lemon juice
- 2 cups cold heavy cream
- 14 oz sweetened condensed milk
- 1 tbsp vanilla bean paste
- ½ tsp almond extract
- 2 oz dark chocolate chopped
Instructions
- Prepare the Mixing Bowl: Begin by placing a large metal or glass mixing bowl into your freezer for at least 15 minutes. This step chills the bowl thoroughly, which will help the cream whip faster and hold its shape better when making the ice cream base. A cold bowl also improves texture, ensuring a smooth, creamy result without melting during mixing.
- Make the Cherry Mixture: Take a small saucepan and add your pitted cherries, granulated sugar, and fresh lemon juice. Do not heat yet. Using a potato masher, gently mash the cherries to release their natural juices. Allow the mixture to rest for about 10 minutes before heating. This resting period encourages the fruit to soften and draw out extra cherry juice, enhancing both flavor and color.
- Cook the Cherries: Place the saucepan over medium heat and cook the cherry mixture for about 10 minutes. Stir occasionally to prevent sticking. Once the mixture reaches a gentle boil and becomes bubbly, reduce the heat to low and let it simmer for another 10 minutes, stirring occasionally. This slow cooking process allows the cherries to soften fully and develop a rich, concentrated flavor. Once cooked, remove the pan from heat and let the cherry mixture cool to room temperature.
- Chop the Dark Chocolate: While the cherry mixture cools, chop your dark chocolate into small, uneven chunks using a sharp knife. This texture will add a delightful surprise in every bite of ice cream. Set aside the chocolate pieces for later.
- Whip the Heavy Cream: Remove the pre-chilled mixing bowl from the freezer. Pour the cold heavy cream into the bowl. Using a hand mixer set to medium-high speed, whip the cream until stiff peaks form. This means that when you lift the beaters, the cream holds its shape firmly without collapsing. Whipping the cream properly is critical for a light, airy ice cream texture.
- Incorporate Sweetened Condensed Milk and Flavors: Reduce the mixer speed to low and pour in the sweetened condensed milk, vanilla bean paste, and almond extract. Fold these ingredients gently into the whipped cream using a silicone spatula or spoon. Avoid overmixing to maintain the fluffy texture of the cream while ensuring flavors are evenly distributed.
- Add Chocolate Chunks: Gently fold the chopped dark chocolate into the cream mixture. This adds rich texture and a hint of indulgent bitterness that complements the sweet cherries. Ensure the chocolate is evenly distributed but avoid excessive mixing that could deflate the whipped cream.
- Layer the Cherry Mixture: Transfer half of the cream and chocolate mixture into a prepared loaf pan (9×5×3 inches) or an 8-inch round cake pan. Spoon half of the cooled cherry mixture over the top. Repeat by adding the remaining cream mixture, then the rest of the cherry mixture. Using a spatula or the back of a spoon, gently swirl the cherries into the cream mixture to create a beautiful marbled effect.
- Top with Extra Chocolate: Sprinkle additional chopped dark chocolate on top for a decorative and flavorful finish. This topping will melt slightly into the ice cream while freezing, adding extra bursts of flavor and texture.
- Freeze Until Firm: Cover the pan tightly with plastic wrap to prevent freezer burn and protect flavor. Place the pan in the freezer and allow the ice cream to set for at least 5–6 hours, or until firm. Overnight freezing works best for the richest flavor and optimal texture.
- Serve and Enjoy: When ready to serve, remove the ice cream from the freezer about 5 minutes before scooping to make it easier to portion. Use an ice cream scoop dipped in warm water for perfect scoops. Garnish with fresh cherries, edible flowers, or additional dark chocolate shavings for a restaurant-style presentation.
Notes
- Using cold heavy cream and a pre-chilled mixing bowl is key for achieving a smooth and fluffy texture.
- Fresh cherries provide the brightest flavor, but frozen cherries are an excellent substitute if fresh aren’t available. Always thaw and drain before cooking.
- Removing as much cherry juice as possible enhances both the color and richness of the ice cream.
- Adjust sweetness to taste by adding more or less sugar depending on cherry ripeness.
- For extra texture, fold in chopped nuts like pistachios or toasted almonds along with the chocolate.
