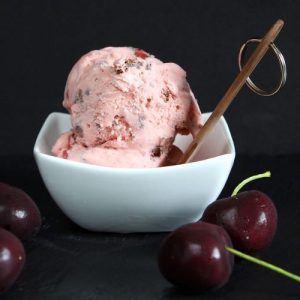
Cherry Chocolate Brownie Ice Cream
Rich, creamy, and no-churn, this Cherry Chocolate Brownie Ice Cream combines soft brownie chunks and juicy candied cherries. Ready in just over six hours, it’s an effortless dessert that delivers decadent flavor with minimal prep.
Equipment
- 1 sharp knife
- 1 large mixing bowl
- 1 fridge
- 1 large airtight container
- 1 freezer
Ingredients
- 120 –140 g super-gooey chocolate brownies cut into small cubes
- 300 g candied cherries not drained, chopped (or maraschino/dark glacé cherries)
- 397 g sweetened condensed milk 1 standard tin
- 500 ml double cream heavy cream
- 2 tsp vanilla extract
- 2 –3 tbsp Kirsch cherry liqueur, optional
Instructions
- Prepare the Brownie Cubes: Start by cutting your super-gooey chocolate brownies into small, bite-sized cubes using a sharp knife. Take care to make the pieces roughly uniform so that they distribute evenly throughout the ice cream. Once cut, place the brownie cubes in the fridge to chill while you prepare the other components. This will help them maintain their texture and not melt too quickly when folded into the ice cream mixture.
- Chop the Candied Cherries: Measure out the candied cherries into a medium-sized bowl. Using a sharp knife, carefully halve or quarter each cherry depending on your preferred bite size. To make this easier and reduce sticky syrup mess, try cutting the cherries while they are still in the bowl, gently pressing them down with the knife. Keep all the syrup—it adds natural sweetness and moisture to the ice cream.
- Mix Condensed Milk with Cherries: Pour the measured sweetened condensed milk over the chopped cherries in the bowl. Stir gently to combine, ensuring every piece of cherry is coated with the creamy sweetness. This mixture forms the flavor base for the ice cream. Once combined, place the bowl in the fridge to chill for at least 10–15 minutes. Chilling helps the mixture thicken slightly and keeps the whipped cream from deflating when added.
- Whip the Cream to Soft Peaks: In a large mixing bowl, pour the double cream and add the vanilla extract. Using a hand whisk, stand mixer, or electric beater, whip the cream until it holds soft peaks. Soft peaks mean the cream is thickened but still slightly droopy at the tips when you lift the whisk. This stage is crucial for a light and airy ice cream texture. Be careful not to over-whip, or it will turn grainy and butter-like.
- Loosen the Cherry Mixture: Take a small spoonful of the chilled cherry-condensed milk mixture and fold it into the whipped cream. This step helps lighten the cherry mixture and makes it easier to incorporate without losing airiness. Stir gently and evenly, ensuring it is fully loosened but still thick.
- Fold Cherry Mixture into Cream: Carefully add the remaining cherry-condensed milk mixture to the whipped cream. Using a large spatula, fold it through gently in a sweeping motion. Take care to maintain as much air as possible in the whipped cream. Folding, rather than stirring, ensures the ice cream stays light, fluffy, and creamy rather than dense.
- Add Optional Kirsch Liqueur: If you are using Kirsch or another cherry liqueur, fold it into the mixture at this stage. The liqueur enhances the cherry flavor and adds a subtle depth to the ice cream. Mix gently to evenly distribute without deflating the cream.
- Incorporate Brownie Cubes: Remove the chilled brownie cubes from the fridge and gently fold them into the ice cream mixture. Use slow, deliberate motions to evenly disperse the cubes without breaking them. This ensures that each scoop of ice cream has a perfect combination of creamy base and gooey brownie chunks.
- Transfer to Freezer-Safe Container: Spoon the completed ice cream mixture into a large, airtight freezer-safe container. Use a spatula to smooth the surface, ensuring an even layer for uniform freezing. Press down gently to remove any large air pockets.
- Freeze Until Firm: Place the container in the freezer and allow it to freeze completely for at least 6 hours, or preferably overnight for the best texture. Because this is a no-churn ice cream, it will firm up without the need for an ice cream machine, but the chilling process is crucial to develop the creamy consistency and integrate the flavors fully.
- Serve and Enjoy: When ready to serve, remove the ice cream from the freezer and let it sit at room temperature for 5–10 minutes to soften slightly, making scooping easier. Use a sharp ice cream scoop or spoon to serve into bowls or cones. Each bite will deliver rich chocolate brownie chunks, sweet juicy cherries, and a creamy, velvety base. Perfect for dessert, parties, or anytime a decadent treat is needed.
Notes
- Use super-gooey brownies for best results, as firmer or dry brownies may harden in the freezer and affect the ice cream texture.
- Chilling the cherry-condensed milk mixture before folding into the whipped cream helps maintain the airiness and prevents the cream from deflating.
- Keep some of the cherry syrup—it enhances sweetness, flavor, and moisture in the ice cream.
- Optional Kirsch adds depth but can be omitted for a child-friendly version.
- Make sure to use a large, airtight container for freezing to avoid ice crystals forming and maintain a smooth, creamy consistency.
