Delicious Garlic Cheese Grits
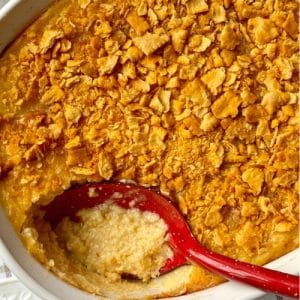
These Garlic Cheese Grits are creamy, cheesy, and infused with garlic for a flavorful side dish. Easy to prepare and baked to perfection, they’re perfect for breakfast, lunch, or dinner. Topped with a crunchy cheese cracker crust, they are a comforting, protein-rich addition to any meal.
Equipment
- 2-quart casserole dish (1)
- Medium saucepan (1)
- Mixing bowl (1)
- Whisk (1)
- Knife – 1
- Measuring cups and spoons (1 set)
Ingredients
- 1 ½ cups uncooked instant or regular grits
- 1 stick ½ cup butter or margarine
- 12 oz cheese Velveeta, cheddar, or preferred variety
- 1 tablespoon garlic powder
- 3 large eggs
- 1 cup milk
- 1 cup crushed cheese crackers
Instructions
- Prepare the Grits Base: Begin by bringing a medium saucepan of water (as directed on your grits package) to a gentle boil. Slowly stir in 1 ½ cups of uncooked instant or regular grits, whisking continuously to prevent lumps. Reduce heat to low and allow the grits to cook according to package instructions—usually 5 minutes for instant grits or 20–25 minutes for regular grits—stirring occasionally. Once cooked, remove the saucepan from heat and let the grits sit for a minute to thicken slightly.
- Add Butter and Garlic Flavor: While the grits are still hot, add 1 stick (½ cup) of butter or margarine. Stir thoroughly until the butter melts completely into the creamy grits. Next, sprinkle 1 tablespoon of garlic powder evenly over the grits. Stir well to ensure the garlic flavor is distributed throughout, creating a savory, aromatic base for the dish. Taste and adjust garlic if needed for your preferred flavor intensity.
- Incorporate the Cheese: Cut 12 oz of your chosen cheese—Velveeta, cheddar, or a mix—into small, even-sized chunks for easy melting. Gradually fold the cheese pieces into the warm grits, stirring consistently so each bite becomes creamy and cheesy. The residual heat from the grits will gently melt the cheese, resulting in a smooth, velvety texture that forms the foundation of this rich, comforting dish.
- Mix Eggs and Milk: In a separate mixing bowl, crack 3 large eggs and pour in 1 cup of milk. Whisk vigorously until the eggs and milk are fully combined into a smooth, pale yellow mixture. This mixture adds creaminess, structure, and protein to the grits while helping the casserole bake evenly without drying out.
- Combine Grits and Egg Mixture: Slowly pour the egg-and-milk mixture into the cheesy grits, stirring constantly to ensure the ingredients are fully incorporated. The mixture should be smooth, slightly thick, and well-blended. This step ensures the eggs are evenly distributed, giving the baked grits a tender, custard-like texture once cooked.
- Prepare the Baking Dish: Preheat your oven to 350°F (175°C). While the oven warms, lightly spray a 2-quart casserole dish with nonstick cooking spray to prevent sticking. Pour the grits and egg mixture into the prepared dish, spreading it evenly with a spatula so it bakes uniformly.
- Add Crunchy Topping: For a delightful, golden-brown topping, crush about 1 cup of cheese crackers and sprinkle them evenly over the surface of the grits mixture. The cracker topping adds texture, a slight buttery flavor, and a visually appealing finish to the dish once baked.
- Bake to Perfection: Place the casserole dish in the preheated oven and bake for 40 minutes. To check for doneness, insert a knife into the center of the grits. If it comes out clean or with only a few moist crumbs, the dish is ready. The baked grits should be firm around the edges, creamy in the center, and topped with a golden, crispy crust.
- Rest and Serve: Remove the casserole from the oven and allow it to rest for 5–10 minutes before serving. This resting time helps the grits set slightly, making them easier to scoop and enhancing the overall texture. Serve warm as a comforting side dish alongside breakfast, lunch, or dinner favorites, and enjoy the rich, cheesy, garlicky flavors.
Notes
- Use either instant or regular grits depending on your timing preference; instant grits save time, while regular grits provide a slightly creamier texture.
- Cheese choice is flexible—cheddar, Velveeta, Monterey Jack, or even a blend works beautifully. Adjust the sharpness to your taste.
- For a milder garlic flavor, reduce garlic powder to ½ tablespoon or less.
- Crushed cheese crackers provide a crunchy topping, but panko or breadcrumbs can be substituted for variety.
- Ensure the eggs and milk are well whisked before adding to grits to avoid clumps and ensure even baking.
- This dish can be made ahead and baked just before serving, making it ideal for meal prep or holiday meals.
