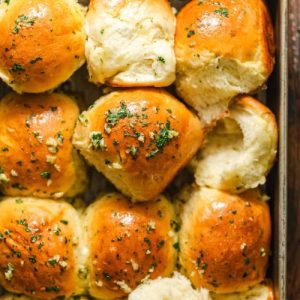
Fluffy Garlic Butter Rolls
These soft, golden garlic butter rolls are tender, flavorful, and brushed with rich garlic butter. Perfect as a side for weeknight dinners or holiday meals, they’re easy to make and a crowd-pleaser every time.
Equipment
- Stand Mixer (1)
- Mixing Bowls (2-3)
- 9×13 Baking Dish (1)
- Pastry Brush (1)
Ingredients
For the Dough:
- 1 cup 244 g whole milk, warmed to 105–110°F
- 2 ¼ tsp 7 g active dry yeast
- 2 tsp 8 g sugar
- 4 cups 500 g all-purpose flour
- 2 tsp 6 g garlic powder
- 1 tsp 2 g onion powder
- 3 tbsp 12 g fresh parsley, chopped
- 1 ½ tsp 9 g kosher salt
- 1 large egg 50 g
- 2 egg yolks 36 g
- 4 tbsp 56 g salted butter, room temperature
For the Garlic Butter Topping:
- 5 tbsp 70 g unsalted butter, melted
- 4 cloves fresh garlic diced
- 2 tsp 0.2 g fresh parsley, chopped
- Pinch kosher salt
Instructions
- Bloom the Yeast: Start by warming your milk to about 105–110°F. It should feel slightly warm to the touch, not hot, to activate the yeast without killing it. In a small mixing bowl, combine the warm milk, active dry yeast, and 1 teaspoon of sugar. Whisk gently to dissolve the yeast, then let it rest for 5–10 minutes. You’ll know it’s ready when the mixture becomes bubbly and frothy, indicating that the yeast is fully activated and alive.
- Incorporate Eggs: Once the yeast mixture is frothy, it’s time to add richness and structure. Add the large egg and the two egg yolks to the yeast mixture.Whisk thoroughly until everything is evenly combined, creating a smooth, pale, slightly thickened liquid. This mixture provides protein and helps the dough rise beautifully while giving the rolls a tender crumb.
- Combine Dry Ingredients: In the bowl of a stand mixer fitted with a dough hook, combine your dry ingredients all-purpose flour, garlic powder, onion powder, chopped fresh parsley, kosher salt, and the remaining teaspoon of sugar. Mixing these first ensures even distribution of flavor and seasoning throughout the dough.
- Form the Dough: Pour the yeast-and-egg mixture into the stand mixer with the dry ingredients. Turn the mixer to medium-low speed and mix until a rough dough begins to form, approximately 2–3 minutes. Gradually add the room-temperature butter, one tablespoon at a time, ensuring each addition is fully incorporated before adding the next. The dough may appear crumbly or break apart temporarily; this is normal. Continue kneading for 3–5 minutes until the dough becomes smooth, elastic, and slightly tacky to the touch.
- First Rise: Lightly oil a large mixing bowl to prevent sticking. Transfer the kneaded dough into the bowl and cover it tightly with plastic wrap or a clean kitchen towel. Place it in a warm, draft-free area to rise for 1 to 1.5 hours, or until the dough has doubled in size. This step is essential for soft, airy rolls. For cooler kitchens, placing the bowl inside a slightly warmed oven works perfectly.
- Shape the Rolls: Once the dough has risen, gently punch it down to release excess air. Transfer it to a lightly floured surface. Divide the dough into 12 equal pieces (or 9 if you prefer larger rolls). Roll each piece into a smooth ball by cupping it in your hands and rotating it on the counter. This shaping technique helps create rolls with a uniform, round appearance and a soft interior.
- Prepare the Baking Dish: Spray a 9×13-inch baking dish with nonstick baking spray or lightly butter it. Place each dough ball into the dish, leaving a small gap between them for expansion. Cover the pan with a clean kitchen towel and let the rolls rise a second time for 25–40 minutes, until puffy and nearly doubled in size. This second rise ensures soft, tender rolls that pull apart effortlessly.
- Preheat the Oven: About 20 minutes into the second rise, preheat your oven to 350°F (175°C). Ensuring the oven is at the correct temperature before baking helps the rolls cook evenly and develop a golden-brown top.
- Apply Egg Wash: Once the rolls are fully risen and puffy, use a pastry brush to lightly coat the tops with the reserved egg whites. This step promotes a shiny, golden finish and adds a subtle richness to the crust.
- Bake the Rolls: Place the rolls in the preheated oven and bake for 25–30 minutes. Watch carefully as the tops turn a deep golden brown. The aroma of baked garlic and butter will begin to fill your kitchen—a sign that they are nearly ready. Avoid opening the oven frequently, as sudden temperature changes can cause the rolls to collapse.
- Prepare Garlic Butter: While the rolls are baking, melt 5 tablespoons of unsalted butter in a small skillet over medium heat. Add the diced garlic and cook for 2 minutes, stirring frequently, until fragrant but not browned. Remove the skillet from the heat and stir in the chopped parsley and a pinch of kosher salt. This garlic butter will be brushed over the hot rolls, infusing them with a rich, savory flavor.
- Brush Rolls with Garlic Butter: Once the rolls come out of the oven, immediately brush the tops generously with the warm garlic butter. This step adds shine, flavor, and moisture, making each roll irresistibly soft and aromatic. Serve warm for maximum enjoyment.
- Enjoy: Your garlic butter rolls are now ready! They’re perfect as a side for dinner, a snack, or for meal prepping to enjoy throughout the week. Store any leftovers in an airtight container and reheat gently before serving.
Notes
- Use Fresh, Active Yeast: Always check the expiration date on your yeast. Fresh, active yeast ensures your rolls rise properly and develop that perfect soft texture. If your yeast doesn’t foam during blooming, it’s best to start with a new batch.
- Measure Ingredients Precisely: For best results, weigh your flour or use the spoon-and-level method. Too much flour can make the rolls dense, while too little can make the dough sticky and difficult to shape.
- Butter Temperature Matters: Room-temperature butter incorporates more smoothly into the dough, creating tender, airy rolls. Avoid using cold butter straight from the fridge.
- Patience with Rising: Allow both rises to finish fully. Rushing the dough can lead to rolls that are dense or unevenly baked.
- Garlic Butter Brushing: Brush the rolls immediately after baking for a glossy, flavorful finish. Warm butter penetrates the soft crust, enhancing flavor and moisture.
