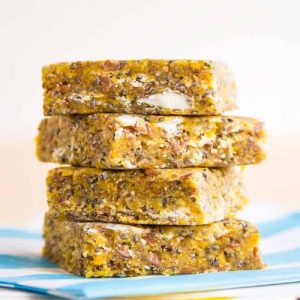
Healthy Mango Energy Bars
Chewy, tropical, and packed with goodness, these Mango Energy Bars are made with dates, dried mango, seeds, and coconut for a naturally sweet and nourishing snack. They’re no-bake, quick to prepare, and perfect for a healthy treat anytime.
Equipment
- 1 food processor (large)
- 1 8x8-inch or 9x9-inch square pan
- 1 spatula
- 1 sheet wax paper or parchment paper
- 1 small rolling pin or flat glass
Ingredients
- 1 cup pitted dates
- ¾ cup dried mango about one 5 oz package
- ½ cup unsweetened shredded coconut
- ¼ cup flax seeds
- ¼ cup chia seeds
- 1 –2 tablespoons water as needed
- 2 tablespoons white chocolate chips vegan optional
Instructions
- Prepare the Pan for Setting: Line an 8x8-inch or 9x9-inch square baking pan with either wax paper or parchment paper, leaving a little overhang on the sides. This extra paper will act like handles, making it easier to lift the bars out once they’ve set. Smooth out any wrinkles in the paper so the mixture spreads evenly later.
- Combine the Base Ingredients: Add the pitted dates, dried mango, shredded coconut, flax seeds, and chia seeds into the bowl of a large food processor. Make sure the dates are soft—if they seem dry, you can soak them in warm water for 5 minutes, then pat dry before using. This helps them blend into a smooth, sticky mixture.
- Process into a Thick Paste: Turn on the food processor and allow the blades to run until the mixture begins to clump together. At first, it may look crumbly, but as the natural oils from the seeds release and the dates break down, the mixture will form a dense, sticky mass. Stop the machine occasionally to scrape down the sides with a spatula to ensure everything blends evenly. If the mixture feels too dry or doesn’t hold together, add 1–2 tablespoons of water, one at a time, and continue pulsing until it forms a thick, pliable paste.
- Add White Chocolate for Texture: Break up the mixture slightly with a spatula inside the processor bowl. Sprinkle in the white chocolate chips and pulse just a few times—enough to chop the chips lightly and distribute them throughout the mixture. Avoid over-processing at this stage, as you want small bits of chocolate for a chewy texture instead of melting it completely.
- Press Mixture Firmly into Pan: Transfer the sticky mixture into your prepared baking pan. Spread it out evenly using the spatula, pressing firmly into the corners. For a perfectly flat and compact surface, place another sheet of wax or parchment paper over the top, then press down using the bottom of another pan or roll over it with a glass or rolling pin. The goal is to compress the mixture so the bars hold together well once chilled.
- Chill to Set Firmly: Place the pan in the refrigerator for 30–45 minutes to allow the bars to firm up. This chilling time helps the natural sugars and seeds bind together, making slicing much easier. If you’re short on time, you can place the pan in the freezer for about 15 minutes, but don’t freeze too long, or the bars may become difficult to cut.
- Slice into Bars or Squares: Once chilled, lift the entire block of mixture out of the pan using the paper overhang. Place it on a cutting board and use a sharp knife to cut into 16 even bars or squares, depending on your preferred size. For clean edges, wipe the knife between cuts.
- Store and Enjoy Anytime: Transfer the bars into an airtight container, layering parchment paper between them to prevent sticking. Keep refrigerated for up to one week or freeze for longer storage. These bars are ready to grab whenever you need a healthy snack—perfect for lunchboxes, pre-workout fuel, or an afternoon energy boost.
Notes
- Use soft dates for the best binding; if they’re firm, soak briefly in warm water.
- A food processor is essential to achieve the thick, sticky paste that holds the bars together.
- If the mixture feels too dry, add water slowly, one tablespoon at a time.
- Lightly pulsing the white chocolate chips keeps texture while preventing them from melting.
- Pressing the mixture firmly and evenly ensures the bars slice neatly after chilling.
- These bars are naturally vegan-friendly if you swap in dairy-free chocolate.