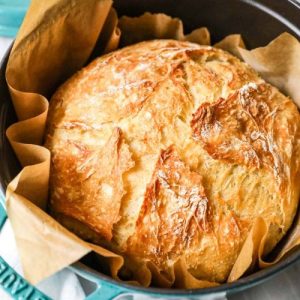
Homemade Artisan Bread
Create a soft, golden artisan bread at home with this easy, no-fuss recipe. Naturally egg- and dairy-free, it’s high in fiber and plant-based protein, perfect for breakfast, sandwiches, or meal prep. Bake in a Dutch oven or on a baking sheet for a versatile, satisfying loaf any time of day.
Equipment
- 1 large mixing bowl
- 1 whisk
- 1 baking sheet or 4 qt Dutch oven
- Parchment Paper
- Instant-read thermometer (optional but recommended)
Ingredients
- 3 ½ cups 437 g bread flour, plus extra for dusting
- 2 ¼ teaspoons 7 g instant yeast
- 1 tablespoon 12 g granulated sugar (optional)
- 1 ½ teaspoons 10 g salt
- 1 ½ cups 360 ml warm water, 115°F/46°C
Instructions
- Prepare Dry Ingredients: Start by gathering all your dry ingredients bread flour, instant yeast, salt, and sugar (if using). In a large mixing bowl, whisk them together thoroughly. This ensures the yeast is evenly distributed and the salt won’t interfere with the yeast’s activity. Taking a moment here will give your bread an even texture and consistent rise.
- Add Warm Water: Measure 1 ½ cups (360 ml) of water and warm it to about 115°F (46°C) — comfortably warm to the touch, not hot. Pour the water gradually into the dry mixture while stirring with a spoon or spatula. The dough will start to come together, forming a sticky, shaggy mass. Avoid adding too much extra flour at this stage; the stickiness is normal and necessary for a soft, airy crumb.
- Initial Mixing: Using a spatula or your hand, mix the dough until all the flour is incorporated. Scrape down the sides of the bowl to make sure nothing is left dry. The dough should be sticky, slightly wet, and uneven — don’t worry, it will smooth out during the rising and folding process.
- First Rise (Bulk Fermentation): Cover the mixing bowl tightly with plastic wrap or a damp kitchen towel. Place the bowl in a warm, draft-free area and allow the dough to rise until it has doubled in size, usually 2–3 hours. For a slower, more complex flavor, you can skip this initial rise and refrigerate the dough overnight — it will develop flavor as it chills, making it ideal for advanced preparation.
- Prepare Workspace: Generously flour a clean countertop or large cutting board. This prevents sticking during shaping. Scrape the risen dough out onto the floured surface using a bench scraper or spatula. Sprinkle a light dusting of flour on top of the dough if it feels very sticky, but don’t overdo it — too much flour can make the bread dense.
- Shape the Dough: Gently form the dough into a rough ball by folding the edges underneath itself. The goal is a round, smooth shape rather than a flat disc. Take your time to handle the dough lightly — overworking can deflate the bubbles that give the bread its airy texture.
- Stretch and Fold Technique: Now perform the “stretch and fold” technique to strengthen the dough’s structure: Imagine your dough as a clock face. Lift the top portion (12 o’clock) and fold it down to the bottom (6 o’clock). Turn the dough 90 degrees and repeat. Repeat this process two more times for a total of four stretches and folds. This step develops gluten, giving your bread structure and a chewy, artisanal texture.
- Final Rest Before Baking: Place the shaped dough onto a large piece of parchment paper. Cover loosely with plastic wrap and allow it to rest for 30 minutes. During this resting period, preheat your oven to 450°F (230°C) with a 4-quart Dutch oven inside. Preheating the pot ensures a burst of steam when the dough is baked, resulting in a crisp, golden crust.
- Score the Bread: After the dough has rested and the oven is preheated, carefully remove the hot Dutch oven using oven mitts. Using a sharp knife or bread lame, make one long slash along the top of the dough. Scoring allows the bread to expand evenly while baking and gives it that classic artisan look.
- Bake Covered: Gently lift the parchment paper with the dough and lower it into the preheated Dutch oven. Cover with the lid and place it back into the oven. Bake for 30 minutes covered. The lid traps steam, creating a light, crispy crust and a tender, airy interior.
- Bake Uncovered: After 30 minutes, carefully remove the lid and continue baking for an additional 10 minutes. This step allows the crust to turn a deep golden brown. For accuracy, check the internal temperature with an instant-read thermometer — it should reach 195–200°F (90–93°C) in the thickest part of the loaf.
- Cool the Bread: Once baking is complete, remove the Dutch oven from the oven and allow the bread to cool inside for 10 minutes. Then, using the parchment paper, carefully lift the loaf and transfer it to a cooling rack. Let it cool completely before slicing — cutting too soon can result in a gummy interior.
Notes
- This artisan bread is naturally egg- and dairy-free, making it suitable for plant-based diets.
- Dough stickiness is normal — resist the urge to over-flour, as it can make the loaf dense.
- Overnight refrigeration develops a deeper flavor and makes the recipe highly flexible for meal prep.
- A Dutch oven produces the crispiest crust, but alternatives like a baking sheet or bread pan work well.
- Use an instant-read thermometer to ensure the interior reaches 195–200°F (90–93°C), guaranteeing a fully baked, soft center.