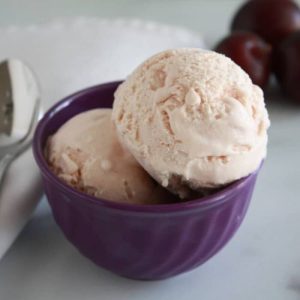
Quick Homemade Plum Ice Cream
This homemade plum ice cream combines fresh, ripe plums with rich cream and eggs for a smooth, creamy texture. Slightly sweet and subtly tart, it’s perfect for hot summer days. Simple to prepare, with a beautiful plum swirl, it’s a dessert that feels indulgent yet wholesome.
Equipment
- 1 ice cream maker
- 1 blender or food processor
- 1 Medium mixing bowl
- 1 hand mixer
- Measuring Cups and Spoons
- Air-tight container for freezing
Ingredients
- 1 cup very ripe plums peeled, pitted, and chopped (about 10–12 small plums)
- ¼ cup granulated sugar for plums
- 2 large eggs at room temperature
- ½ cup granulated sugar for custard
- 2 cups heavy cream
- 1 cup whole milk avoid low-fat or skim milk
- ½ teaspoon vanilla extract
Instructions
- Prepare the Ice Cream Maker: Before you do anything, make sure your ice cream maker’s freezing bowl is completely chilled. Most models require the insert to sit in the freezer for at least 12 hours, preferably overnight. This step is crucial because a cold base ensures your ice cream churns evenly and develops a smooth, creamy texture instead of icy crystals forming.
- Prep the Plums: Start by washing, peeling, pitting, and chopping your ripe plums. Place the chopped plums in a medium-sized bowl or a single-serving blender capsule and sprinkle with ¼ cup of sugar. Using a fork or potato masher, mash the plums gently as you go. Let the mixture sit in the refrigerator for about 30 minutes. This allows the sugar to draw out the natural juices, softening the fruit for a smooth puree.
- Blend the Plum Puree: After chilling, transfer the plum mixture into a blender or food processor. Blend until completely smooth. If you prefer a slightly chunky texture, pulse briefly instead of blending continuously. Set aside three-quarters of this puree for the custard mixture and refrigerate the remaining portion to use later as a swirl, keeping it cold until ready.
- Make the Custard Base: In a medium mixing bowl, combine your two eggs with ½ cup sugar. Use a hand mixer to beat the mixture until it becomes light, frothy, and pale yellow in color. This step ensures the custard is airy and will contribute to a creamier ice cream. Next, slowly pour in the heavy cream, milk, and vanilla extract while continuing to mix. Your custard should now be smooth, slightly thickened, and lightly tinted.
- Incorporate the Plum Puree: Add three-quarters of the prepared plum puree to the custard mixture. Gently fold or mix until the color is evenly distributed. The mixture will take on a soft pink hue. Be careful not to overmix if you want subtle swirls in the ice cream later. Once combined, place the bowl in the freezer for about 30 minutes. This step chills the custard thoroughly, which is key for smooth churning.
- Chill the Remaining Plum Puree: While the custard chills, ensure the leftover plum puree is refrigerated. Avoid adding warm puree to the ice cream base later, as this can affect the texture and prevent proper freezing. Keeping it cold also helps maintain the vivid color and natural flavor when swirled in the finished ice cream.
- Churn the Ice Cream: Once the custard has chilled, pour it into your pre-frozen ice cream maker. Turn the machine on and let it churn according to the manufacturer’s instructions, usually about 20–25 minutes, until the mixture reaches a soft, thick consistency similar to soft-serve. About one minute before the churn is complete, slowly drizzle in the reserved plum puree to create beautiful, natural swirls throughout the ice cream.
- Transfer to Freezer Container: Spoon the freshly churned ice cream into a freezer-safe, air-tight container. Use a spatula to smooth the top and ensure the swirl is visible for a visually appealing presentation. Don’t press too hard, or you’ll lose the delicate marbled effect.
- Freeze Until Firm: Cover the container tightly and place it in the freezer for 1–2 hours to allow the ice cream to firm up. Chilling longer will produce a more solid texture, while a shorter freeze will yield a softer, scoopable consistency. This step ensures your ice cream keeps its creamy texture while being easy to serve.
- Serve and Enjoy: When ready to serve, remove the ice cream from the freezer 5–10 minutes beforehand to soften slightly for easier scooping. Use an ice cream scoop to create perfect portions, and consider topping with fresh plum slices, a sprinkle of chopped nuts, or a drizzle of honey for added flavor and presentation. This plum ice cream is perfect for summer days, special occasions, or anytime you crave a fresh, fruity, and creamy dessert.
Notes
- Use very ripe plums for maximum flavor and natural sweetness. If they are slightly tart, the ice cream will have a more complex, refreshing taste.
- Make sure the custard mixture is well-chilled before churning; this prevents icy textures and creates a smooth, creamy ice cream.
- Reserve some plum puree for swirls—it not only adds visual appeal but also gives bursts of fresh fruit flavor in every bite.
- Avoid using low-fat or skim milk, as whole milk contributes to creaminess and body in the finished ice cream.
- Softened ice cream straight from the freezer may be difficult to scoop. Let it sit at room temperature for 5–10 minutes for perfect servings.
