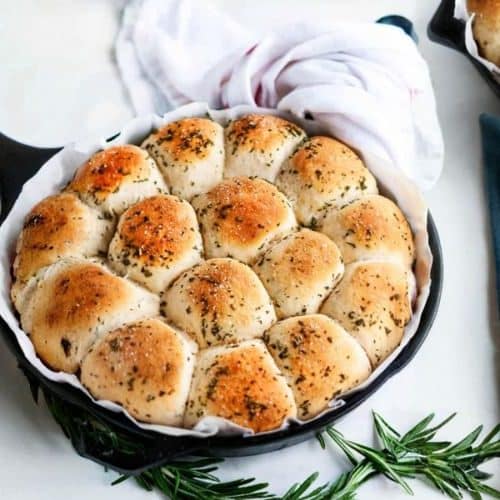
Rosemary Garlic Dinner Rolls
Soft, fluffy rosemary garlic dinner rolls bursting with fresh herbs and buttery goodness, perfect for pairing with soups, stews, or any meal needing a comforting side.
Equipment
- 1 Stand mixer with dough hook attachment
- 1 Microwave-safe bowl
- 1 9x13 inch baking dish
- 1 Pastry brush
- 1 Pizza cutter or sharp knife
Ingredients
- ¾ cup water
- 1 tablespoon rapid-rise instant yeast
- 3 tablespoons sugar
- ½ cup milk 2% recommended
- 4 tablespoons unsalted butter plus extra for greasing
- 1 large egg beaten
- 1 ½ teaspoons salt
- 3 ½ to 4 cups all-purpose unbleached flour
- 2 tablespoons fresh rosemary minced
- 3 garlic cloves minced
Instructions
- Prepare Your Workspace and Equipment: Before beginning, ensure all your ingredients are measured and ready. Grease a 9x13-inch baking dish with butter or line it with parchment paper to prevent sticking and ease cleanup. Preheat your oven to 400°F (205°C) so it will be ready when your rolls need baking. Having your workspace organized will make the process smoother and more enjoyable.
- Warm the Liquid Ingredients to Activate Yeast: In a microwave-safe bowl, combine ¾ cup of water, 3 tablespoons of sugar, 3 tablespoons of butter, and ½ cup of milk. Heat this mixture for about 1 minute, then check the temperature with your finger—it should be warm but not hot, ideally between 110°F and 115°F (43°C to 46°C). If it’s cooler, continue heating in 10-15 second intervals, whisking after each, until the right warmth is reached. This precise temperature range is critical for activating the yeast without killing it.
- Activate the Yeast: Pour the warmed liquid mixture into the bowl of your stand mixer fitted with the dough hook attachment. Sprinkle 1 tablespoon of rapid-rise instant yeast evenly over the surface of the liquid. Let it sit undisturbed for 5 to 7 minutes. During this time, the yeast will begin to foam and bubble, signaling that it’s active and ready to leaven your dough. This step ensures your rolls will rise beautifully.
- Combine Dry and Wet Ingredients into Dough: Add 3½ cups of unbleached all-purpose flour to the yeast mixture, followed by 1½ teaspoons of salt, 1 tablespoon of minced fresh rosemary, 3 minced garlic cloves, and the beaten egg. Set your mixer to the lowest speed (“stir” or “slow” setting) and mix for 1 to 2 minutes until the ingredients start to come together and form a shaggy dough. The dough will cling to the sides of the bowl initially but should begin pulling away. If it’s still too sticky, gradually add flour ¼ cup at a time, mixing after each addition, but do not exceed 4 cups total. This gradual flour addition helps you achieve the perfect dough texture.
- Knead the Dough to Develop Gluten: Once the dough has started to pull away from the bowl and is only slightly sticky, increase the mixer speed to medium-low and knead the dough for 5 full minutes. This kneading process develops the gluten network, which gives the rolls their tender but structured crumb. Proper kneading will result in a smooth, elastic dough that springs back when gently pressed with a finger.
- First Rise – Proofing the Dough: Lightly butter a large mixing bowl. Remove the dough from the mixer and transfer it to the greased bowl, turning it over once so the entire surface is coated with butter to prevent drying. Cover the bowl tightly with plastic wrap or a damp kitchen towel to trap moisture and warmth. Set the bowl in a draft-free, warm place and allow the dough to rise for 20 minutes. During this time, the yeast ferments, causing the dough to expand and become airy.
- Shape the Rolls: After the dough has risen, gently turn it out onto a generously floured surface. Using your fists, softly punch the dough down to release trapped air without deflating it completely. With a sharp pizza cutter or knife, slice the dough into 15 equal pieces for consistent roll sizes. Take each piece and fold the edges under, rolling it gently between your palms to form smooth, tight balls. This folding creates surface tension, helping the rolls hold their shape and rise upward rather than spread out.
- Second Rise – Preparing for Baking: Place each shaped dough ball seam side down onto your prepared baking dish, leaving a little space between each so they can expand. Cover the baking dish loosely with plastic wrap or a damp towel to keep the dough moist. Let the rolls rise again for 20 minutes. This second rise, called proofing, allows the rolls to puff up and develop a light, fluffy texture when baked.
- Prepare Rosemary Garlic Butter Glaze: While the rolls complete their second rise, melt the remaining 1 tablespoon of butter in a small bowl or microwave-safe container. Stir in the remaining 1 tablespoon of minced fresh rosemary until evenly combined. This aromatic butter glaze will be brushed on top of the rolls just before baking, giving them a beautiful golden color and an extra burst of herbaceous flavor.
- Brush Rolls and Bake: Once the rolls have puffed up nicely, carefully remove the plastic wrap or towel. Using a pastry brush, generously coat the tops of each roll with the rosemary garlic butter mixture. This step ensures a flavorful, golden crust that is both visually appealing and delicious. Immediately place the baking dish in your preheated oven and bake for 13 to 15 minutes. Keep an eye on the rolls; they should be cooked through with a lightly browned top when done.
- Cooling and Serving: When the rolls are baked to perfection, remove them from the oven and let them cool in the pan for a few minutes. This brief resting period helps the rolls firm up slightly for easier handling while maintaining softness inside. Serve the rolls warm, ideally fresh from the oven, alongside your favorite soups, stews, or any hearty meal. They’re perfect for soaking up sauces or enjoying plain.
Notes
For the softest and fluffiest rolls, ensure your water and milk mixture is warm but not too hot, ideally between 110°F and 115°F, to activate the yeast properly without killing it. Use fresh yeast for the best rise; if your yeast is old or expired, the dough may not rise well. When adding flour, do so gradually—too much flour can make rolls dense and dry. Folding the dough pieces under while shaping helps create surface tension that promotes a nice rise and uniform shape. Lastly, brushing the rolls with the herbed butter before baking gives them a beautiful golden crust and enhanced flavor.
