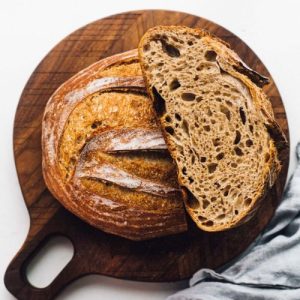
Spelt Sourdough Bread
A rustic sourdough bread made with whole-grain spelt and bread flour, offering a nutty flavor, chewy texture, and crisp golden crust. Naturally fiber-rich and packed with plant-based protein, this wholesome loaf is both nourishing and satisfying—ideal for everyday meals or meal prep.
Equipment
- 1 large mixing bowl
- 1 fork or spatula
- Clean kitchen towel (damp)
- 1 banneton basket
- 1 plastic bag (large, for covering)
- 1 Dutch oven with lid
- 1 cutting board or large plate
- Parchment paper (1 large sheet)
Ingredients
- 65 g active sourdough starter at peak
- 315 g filtered warm water about 80°F
- 10 g honey or maple syrup
- 240 g bread flour
- 200 g whole-grain spelt flour
- 9 g fine sea salt
Instructions
- Mix Starter and Liquid: Begin by combining your active sourdough starter with warm, filtered water in a large mixing bowl. The water should feel slightly warm to the touch, around 80°F, to encourage fermentation without harming the yeast. Add the honey or maple syrup, which will give the dough a subtle sweetness and help feed the starter. Whisk gently with a fork until the mixture is uniform and slightly frothy.
- Incorporate Flours: Gradually add the bread flour and whole-grain spelt flour to the liquid mixture. Start mixing with a fork or spatula to combine, ensuring all flour is hydrated. Switch to your hands as the dough thickens. The dough will feel sticky and rough—this is normal. Make sure there are no dry pockets of flour remaining.
- Add Salt and Begin Autolyse: Sprinkle the fine sea salt evenly over the dough surface. Do not knead it in immediately. Cover the bowl with a damp towel and let it rest for 1 hour. This resting period, called autolyse, allows the flour to fully absorb water, starts gluten development, and enhances the flavor and texture of the bread.
- Initial Hand Kneading: After the autolyse, gently work the dough with your hands. Use a squeezing and folding motion for about 2 minutes to start building the gluten structure. The dough should feel elastic yet soft. This step ensures the final loaf has a chewy, satisfying crumb.
- First Stretch and Fold: With wet or lightly floured hands, lift one side of the dough and fold it over onto itself. Rotate the bowl 90 degrees and repeat until all sides have been folded. Cover the dough again and let it rest for 30 minutes. Stretch and folds help strengthen gluten without heavy kneading, creating an airy, light interior.
- Second Stretch and Fold: Repeat the stretch and fold process for a second time. Take care to handle the dough gently so as not to deflate the developing bubbles. Cover and rest for another 30 minutes.
- Third Stretch and Fold: Perform a third round of stretch and folds, carefully supporting the dough as you manipulate it. Allow it to rest again for 30 minutes, covered. This gradual development ensures a strong gluten network for a beautifully structured loaf.
- Final Stretch and Fold: Complete the fourth and final stretch and fold. After this step, cover the dough and allow it to rise until it increases by approximately 75%—a little short of doubling. You should see small bubbles forming throughout the dough, with a few visible on top. The dough should jiggle slightly when the bowl is moved. Focus on visual cues rather than strict timing.
- Pre-Shaping the Dough: Lightly flour your work surface. Gently transfer the dough from the bowl and shape it into a rough round. Let it rest uncovered for 15 minutes to relax the gluten. This resting period makes the final shaping easier and helps the dough retain its shape during baking.
- Final Shaping: Shape the dough into a rustic, tight round using your preferred method. Carefully place it seam-side up in a well-floured banneton. Cover with a plastic bag or large garbage bag to prevent drying.
- Cold Proofing: For best flavor and texture, place the covered banneton in the refrigerator for an overnight cold proof. This slow fermentation develops deeper flavor and improves the crumb. If you prefer to bake the same day, allow the dough to rise at room temperature until it increases an additional 15–20%.
- Preheating the Oven: When ready to bake, preheat your oven to 475°F with the Dutch oven inside. The Dutch oven will trap steam during baking, helping the bread develop a crisp, golden crust.
- Transferring Dough to Dutch Oven: Remove the banneton from the fridge. Lay a piece of parchment paper on the countertop, slightly larger than the banneton. Place a cutting board or plate over the banneton and gently invert it so the dough lands on the parchment with the seam now on the bottom. Lift the banneton off carefully. Lightly dust the top with flour and score the dough using a sharp blade to control the expansion during baking.
- Baking Covered: Lift the dough with the parchment into the preheated Dutch oven. Place the lid on and slide the pot onto the middle oven rack. Reduce the heat to 450°F and bake for 25 minutes. The lid traps steam, allowing the crust to form gradually and remain crisp.
- Baking Uncovered: After 25 minutes, remove the lid and lower the oven temperature to 435°F. Bake for another 20 minutes to achieve a deep golden-brown crust with a crunchy exterior.
- Cooling the Bread: Carefully remove the bread from the Dutch oven and transfer it to a cooling rack. Allow it to cool completely for at least 1 hour before slicing. Cooling ensures the crumb sets properly and prevents a gummy texture.
- Storing the Loaf: Once cooled, store the bread in a plastic bag, cut side down, for up to four days. This keeps the crust crisp while maintaining a soft interior. For longer storage, you can freeze slices for convenient, ready-to-use portions.
Notes
- Use an active, bubbly sourdough starter at its peak for best rise and flavor.
- Warm water should be around 80°F; too hot can kill the yeast, too cold slows fermentation.
- Whole-grain spelt flour adds nutty flavor and nutrition but can make dough slightly stickier than wheat flour—handle gently.
- Stretch-and-fold method strengthens gluten without over-kneading; patience during resting periods is key.
- Cold-proofing in the refrigerator overnight enhances flavor and creates a more open, airy crumb.
- Baking in a preheated Dutch oven traps steam, yielding a golden, crispy crust.
- Cool bread fully before slicing to avoid a gummy texture.
- Store cut side down in a bag to maintain softness while keeping the crust crisp.
