Vanilla Ice Cream
Creamy, smooth, and packed with real vanilla flavor, this homemade French vanilla ice cream is a timeless dessert that’s surprisingly simple to make. With just a few ingredients and an ice cream maker, you can whip up a rich custard base that churns into a luscious frozen treat—perfect for pairing with pies, cakes, or enjoying all on its own.
Equipment
- 1 ice cream maker
- 1-Medium pot
- 1 medium bowl
- 1 rubber spatula
- 1 fine-mesh strainer
Ingredients
- 2 cups 480 ml heavy cream
- ¾ cup 180 ml whole milk
- ½ cup 100 g granulated sugar
- 1 vanilla bean split and seeds scraped (or 2 teaspoons vanilla extract)
- 5 large egg yolks
Instructions
- Gather Ingredients and Equipment: Before you start, assemble everything heavy cream, whole milk, granulated sugar, a vanilla bean or vanilla extract, and five large egg yolks. Have your ice cream maker bowl frozen and ready (ideally frozen at least 24 hours). Lay out a medium heavy-bottomed saucepan, a medium mixing bowl, a fine-mesh strainer, a rubber spatula, a whisk, a kitchen thermometer, and a large bowl filled with ice and cold water for an ice bath. Prep makes the process calm and fast — once the custard begins, you’ll move quickly.
- Prepare the Vanilla (Vanilla Bean or Extract): If you’re using a vanilla bean, split it lengthwise with a sharp knife and scrape the seeds into a small bowl. Reserve the pod. The seeds deliver the flecked appearance and intense flavor. If you prefer extract, measure 2 teaspoons and hold it aside — add it later (after cooking) to preserve aroma. If using the bean pod, you’ll add the pod to the milk mixture to steep and remove it before churning or after straining.
- Combine Dairy and Sugar — Warm the Base: Pour the 2 cups of heavy cream and ¾ cup whole milk into the saucepan. Add the ½ cup granulated sugar and the scraped vanilla seeds (and the pod, if using). Warm this mixture over low to medium heat — you want it to gently heat until the sugar dissolves and the surface just begins to steam and ripple, not simmer. Stir frequently with the rubber spatula to dissolve sugar and prevent a skin from forming. This step usually takes several minutes; watch closely and do not allow the liquid to reach a rolling boil.
- Whisk Egg Yolks — Make the Egg Base: While the dairy warms, put the five large egg yolks into the medium bowl and whisk them lightly only until smooth and uniform in color. You want them broken up and slightly fluid — don’t aerate heavily. For a silkier texture, add a tiny pinch of salt (less than 1/8 teaspoon) to the yolks; this helps round and brighten the flavor.
- Temper the Eggs — Gentle Warm-Up: This is a critical protection step. With the yolks whisking constantly, slowly drizzle about ½ cup of the hot milk mixture into the yolks. Add the hot dairy very slowly at first while whisking continuously — this brings the yolks up in temperature gently and prevents scrambling. Once the yolks are warmed (the mixture will look glossy and slightly thickened), slowly pour the tempered yolk mixture back into the saucepan with the remaining dairy while stirring continuously with the spatula.
- Cook the Custard — Heat to Ribbon Stage: Return the saucepan to low to medium heat. Stir constantly, scraping the bottom and sides with the spatula so no yolk clings and cooks unevenly. Attach your thermometer and cook until the mixture reaches 180–185°F (82–85°C) — the classic temperature range where the custard thickens enough to coat the back of a spoon (the “nappe” or ribbon stage). If you don’t have a thermometer, you’re aiming for a texture that clings to the spatula run your finger across the coated spatula and the line should hold. Never let the custard boil; rapid bubbling means you’ve overheated and risk curdling. As soon as you reach temperature, remove from heat.
- Strain and Remove Solids — Ensure Smoothness: Immediately pour the hot custard through a fine-mesh strainer into a clean medium bowl. Use the rubber spatula to press through and catch any tiny bits of cooked egg or bits of vanilla pod. If you used a vanilla pod, remove it during this step (or after cooling if you prefer more infusion). Straining is the single best step to guarantee ultra-smooth, luxurious texture.
- Cool Quickly in an Ice Bath — Stop the Cooking: Place the bowl with strained custard into the prepared ice bath (bowl of ice water). Stir the custard occasionally to speed cooling and help release heat. This rapid cooling prevents further cooking and helps the custard stabilize. If you used vanilla extract instead of a bean, wait until the mixture has cooled a bit (to lukewarm) and then stir in the extract now so the volatile aromas aren’t driven off by heat.
- Cover and Chill Thoroughly — Develop Flavor: Once the custard is at least room temperature or cooler, cover the surface directly with plastic wrap (pressing it to the custard surface reduces a skin). Refrigerate for at least 4 hours or preferably overnight (up to 24 hours). Thorough chilling lets the proteins relax and the vanilla flavor deepen; cold custard churns into a creamier finished ice cream because cold liquid freezes into smaller crystals.
- Prepare the Ice Cream Maker — Final Readiness: Confirm your ice cream machine bowl is fully frozen (rock-solid). Read the manufacturer’s instructions for your specific unit — different machines have different capacities and recommended churn times. If your machine can hold 2 quarts and you’ve doubled the recipe, proceed only if the volume matches the machine’s capacity.
- Churn the Custard — Transform to Ice Cream: Pour the chilled custard into the ice cream maker and churn according to the machine’s directions. Expect the process to take anywhere from 20 to 40 minutes depending on your machine and bowl temperature. You’re aiming for a soft-serve consistency where the mixture is significantly thicker and holds shape but is still scoopable. Inspect while churning it should increase in volume slightly and look aerated and creamy. Avoid over-churning (which can make the texture overly icy or hard).
- Pack and Freeze — Firm Up to Scoopable Texture: When the churned ice cream reaches soft-serve stage, transfer it immediately into a freezer-safe container. Press a piece of plastic wrap directly onto the surface to prevent ice crystals, then fit a tight lid. Freeze for about 3 hours or until firm enough to scoop easily. For best texture, let it firm overnight; this also helps the flavors meld.
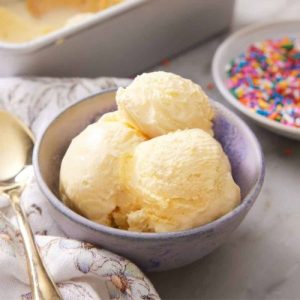
- Serve and Soften — Best Scooping Practice: To serve, remove the container from the freezer and let it sit at room temperature for 8–12 minutes (longer if your freezer is very cold) to soften slightly for perfect scoops. Use a metal ice cream scoop dipped briefly in hot water and dried between scoops for clean, neat balls. Garnish as you like — sauces, fruit, toasted nuts, or a sprinkle of flaky sea salt all work beautifully.
- Store Properly — Maintain Freshness: Store leftover ice cream in the coldest part of your freezer (not the door) and keep it tightly covered. Plastic wrap pressed to the surface plus a sealed lid reduces freezer burn. Homemade is best within 2–4 weeks for peak texture, but can keep up to 1 month. When reheating to soften, avoid repeated thaw-refreeze cycles; portion into smaller containers if you plan to keep some longer.
- Troubleshooting and Optional No-Machine Method: If you notice a grainy texture, it likely indicates tiny overcooked egg bits — always strain and avoid overheating next time. If you don’t have an ice cream maker, freeze the chilled custard in a shallow metal pan and, every 20–30 minutes, vigorously whisk or use a fork to break up ice crystals until evenly frozen (this method takes several hours and requires patience, but produces a respectable result).
Notes
- Tempering the yolks is essential to avoid scrambled eggs. Add hot milk slowly while whisking continuously.
- Strain the custard every time — it guarantees smooth, creamy texture.
- Chill the custard thoroughly before churning; cold base = creamier ice cream.
- Freeze your ice cream maker bowl at least 24 hours in advance.
- For deeper vanilla flavor, steep the scraped pod in the custard as it chills.
- A tiny pinch of salt enhances the overall flavor balance.
- Press plastic wrap directly on the surface of the ice cream before freezing to prevent ice crystals.
- Ice cream is best enjoyed within 2–4 weeks for optimal texture.
