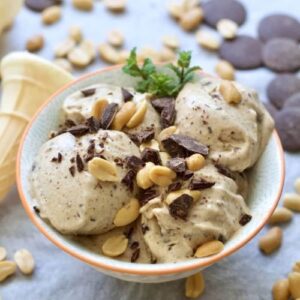
Vegan Banana Ice Cream
A delicious, one-ingredient vegan banana ice cream that’s naturally sweet, creamy, and perfect for a healthy snack or dessert. Made with ripe bananas and optional flavour boosts like peanut butter or cocoa, this fibre-rich recipe is quick to prepare, low in saturated fat, and naturally plant-based — ideal for everyday enjoyment.
Equipment
- 1 high-speed food processor or blender
- Measuring Spoons
- Knife
- Cutting board
- Freezer-safe container
Ingredients
Basic Banana Ice Cream:
- 2 large ripe bananas
Peanut Butter & Chocolate Chunk Variation:
- 2 large ripe bananas
- 3 tbsp peanut butter
- 50 g vegan chocolate chunks or chips
- Salted peanuts and extra chocolate for garnish optional
Double Chocolate Variation:
- 2 large ripe bananas
- 2 –3 tbsp unsweetened cocoa or cacao powder
- Pinch of salt
- Handful of vegan chocolate chunks or chips
- Agave syrup or maple syrup to taste optional
Instructions
- Prepare Bananas for Freezing: Begin by selecting ripe bananas that have a few brown spots for optimal sweetness and texture. Peel them and slice into even rounds about ½ inch thick. Arrange the slices in a single layer on a baking tray lined with parchment paper or a silicone mat to prevent sticking. Place the tray in the freezer and allow the banana slices to freeze for at least 30 minutes. This step is crucial to ensure a smooth, creamy texture when blending. For convenience, you can also freeze them for several hours or overnight.
- Set Up Equipment and Ingredients: While the bananas freeze, gather your equipment and flavour add-ins. You will need a high-speed food processor or blender to achieve the perfect creamy consistency. For the Peanut Butter & Chocolate version, prepare peanut butter and chop vegan chocolate chunks if needed. For Double Chocolate, measure cocoa powder, salt, and optional sweetener. Keep your tools and ingredients ready to streamline the blending process.
- Blend Frozen Bananas: Transfer the frozen banana slices to your food processor or blender. Start blending at a medium speed so the banana begins to break down evenly. At first, the frozen banana will look crumbly — don’t worry. Stop blending occasionally to scrape down the sides with a silicone spatula to ensure even blending. Continue blending until the mixture transforms into a smooth, creamy texture similar to soft-serve ice cream. This may take several minutes depending on your machine’s power.
- Add Additional Flavours (Optional): If you are creating a flavoured variation, now add the extras. For Peanut Butter & Chocolate, blend in peanut butter with the frozen banana until well combined, then fold in the chocolate chunks by hand or pulse briefly so they remain chunky. For Double Chocolate, add cocoa powder, a pinch of salt, and optional sweetener, blending until smooth. Fold in vegan chocolate chunks gently to keep texture intact.
- Adjust Consistency and Taste: Taste your banana ice cream and make any desired adjustments. Add more cocoa for a richer chocolate flavour or a small drizzle of agave or maple syrup for sweetness. Blend lightly if needed. The mixture should be thick and creamy — if it feels too soft, transfer it to the freezer for a firmer texture before serving.
- Serve or Store: For a soft-serve style dessert, serve immediately after blending. Scoop into bowls or cones and garnish as desired. To achieve a firmer texture, transfer the ice cream to a freezer-safe container, cover tightly, and freeze for at least 30 minutes. This will make it easier to scoop and give a traditional ice cream feel.
- Presentation and Garnishing Tips: For an extra special touch, garnish your ice cream with crushed nuts, shredded coconut, fresh fruit, or chocolate shavings. Serve in chilled bowls to preserve creaminess. You can also layer flavours in clear glasses for a visually appealing dessert. Experiment with different toppings to enhance both flavour and presentation.
- Storage Guidelines: Store leftover ice cream in an airtight container in the freezer for up to two weeks. Over time, texture will firm and ice crystals may form. To restore creaminess, allow the ice cream to sit at room temperature for 10–20 minutes before scooping. Avoid repeated thawing and refreezing, as this impacts quality and flavour.
- Helpful Blending Advice: When making banana ice cream, patience is key. Blend in short bursts if your processor struggles, and scrape the sides often. Avoid adding liquid unless necessary, as this will change the texture. Stick to the minimum of two bananas to maintain creaminess and flavour.
- Serving Suggestions and Enjoying: Vegan Banana Ice Cream is a versatile treat. Serve it as dessert, a refreshing snack, or a nutritious breakfast. Pair with fresh berries for a fruity twist or granola for crunch. It’s perfect for everyday cooking — quick, healthy, and satisfying.
Notes
- Use fully ripe bananas for maximum natural sweetness and a smooth texture. Overripe bananas with brown spots work best.
- Slice bananas evenly before freezing to ensure quick and even blending.
- Always freeze bananas in a single layer to prevent sticking together.
- Use a high-speed food processor or blender for the creamiest results — a regular blender may struggle.
- For extra flavour, experiment with different add-ins like vanilla extract, cinnamon, or nut butters.
- This recipe works best when eaten immediately but can be stored for later use.