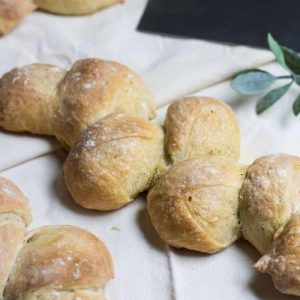
Wheat Stalk Bread
A visually striking artisan bread shaped like wheat stalks, this Pain d’Epi recipe delivers fluffy, airy texture with a crisp crust. Rich in plant-based protein and fiber, it’s perfect for everyday baking or special occasions, offering a healthy, satisfying choice that’s as beautiful as it is delicious.
Equipment
- 1 small mixing bowl
- 1 stand mixer (with paddle attachment) or large mixing bowl and wooden spoon
- 1 large wooden board (for kneading)
- Vegetable oil (for greasing)
- Plastic wrap
- Microwave (or warm, draft-free location)
- 1 half-sheet baking pan
- Parchment paper or silicone baking mat
- Cornmeal
- Kitchen scissors or sharp knife
- Cooling rack
Ingredients
- 1 ¾ tsp active dry yeast
- ⅓ cup warm water about 105°F
- 3 ½ cups all-purpose flour plus extra for dusting
- 2 tsp table salt
- 1 ¼ cup lukewarm water
- Vegetable oil for greasing
- Cornmeal for dusting
Instructions
- Activating the Yeast: Begin by preparing the yeast to ensure your bread rises beautifully. In a small mixing bowl, pour ⅓ cup of warm water, ideally around 105°F — warm to the touch, not hot. Sprinkle 1 ¾ teaspoons of active dry yeast over the water without stirring. Allow it to rest for about 5 minutes. The mixture should become foamy and slightly bubbly, indicating the yeast is active and ready to use.
- Combining Dry Ingredients: In the bowl of a stand mixer fitted with a paddle attachment, add 3 ½ cups of all-purpose flour and 2 teaspoons of table salt. Mix them briefly on low speed until the salt is evenly distributed. If you don’t have a stand mixer, use a large mixing bowl and a wooden spoon, stirring until thoroughly combined.
- Mixing Wet and Dry Ingredients: Slowly pour the activated yeast mixture into the flour and salt mixture. Add 1 ¼ cups of lukewarm water gradually while mixing on low speed. Stir until a sticky dough begins to form and pulls slightly away from the sides of the bowl. If the dough feels too dry, add warm water a teaspoon at a time until it reaches the correct consistency.
- Preparing the Kneading Surface: Lightly grease a large wooden board or work surface with vegetable oil. Sprinkle a small amount of flour on the surface to prevent sticking. Flour your hands to make handling easier, ensuring the dough does not cling excessively while kneading.
- Kneading the Dough: Transfer the sticky dough to your prepared surface. Knead gently for 1–2 minutes, using a folding motion. Grasp one end of the dough, lift it, fold it over itself, then press down with the heel of your hand, pushing forward. Turn the dough slightly and repeat. Continue until the dough becomes smooth and slightly elastic, but still soft. Stop kneading when the dough begins to stick slightly to the board.
- First Dough Rise: Grease a large glass or ceramic bowl lightly with vegetable oil. Place the kneaded dough into the bowl, turning it so all sides are coated with oil. Cover the bowl tightly with plastic wrap to prevent drying. Place the bowl in a warm, draft-free spot — the inside of an unused microwave works well. Let the dough rise for about 2 ½ hours, or until it has tripled in size.
- Preparing for Shaping: Once the dough has risen, carefully remove the plastic wrap. Grease your kneading surface lightly with vegetable oil and dust with flour. Gently transfer the dough to the board, taking care not to deflate it. Handle it delicately to preserve the airy texture developed during the first rise.
- Preheating and Preparing Baking Surface: Preheat your oven to 450°F (232°C). Line a half-sheet baking pan with parchment paper or a silicone baking mat. Dust the lined surface lightly with cornmeal to prevent sticking and add a rustic texture to the bread.
- Shaping the Dough: On your floured surface, gently stretch the dough into a rough square shape. Using a bench scraper or a sharp knife, cut the dough into three equal strips. Shape each strip into a baguette-like form, being careful not to stretch them too much. They should fit comfortably on your baking sheet without touching.
- Creating the Wheat Stalk Shape: Place the shaped loaves on the prepared baking sheet, leaving space between them. Using clean kitchen scissors or a sharp knife, make diagonal cuts along the length of each loaf. These cuts should be deep but not through the bottom. Gently pull each flap of dough to alternate sides — left then right — to create the wheat stalk (Pain d’Epi) shape. Lightly dust with flour for rustic charm.
- Baking the Loaves: Place the shaped loaves in the preheated oven. Bake for 25–30 minutes, or until they are a deep golden brown. For a crisp crust, use a spray bottle filled with water to mist each loaf every 5 minutes during baking. This creates a crunchy crust while keeping the interior light and airy.
- Cooling and Serving: Once baked, carefully transfer the loaves to a cooling rack. Let them cool for about 10 minutes before slicing. This ensures the bread finishes setting and maintains the perfect texture. Serve fresh for best results.
- Storage and Reheating: Allow the bread to cool completely before storing. Wrap tightly in foil and place in a ziplock bag for longer storage. Freeze for up to two months. When ready to enjoy, thaw at room temperature, then reheat in a preheated oven at 400°F (205°C) for 5–10 minutes to restore crispness. Avoid microwaving, as it will soften the crust and alter texture.
Notes
- This bread is best enjoyed fresh, as its crisp crust and fluffy interior are at their peak within the first day.
- Use a kitchen thermometer to ensure water temperature is about 105°F when activating yeast — too hot or cold water can affect yeast performance.
- Handle the dough gently after the first rise to maintain its airy structure.
- Cornmeal dusting on the baking sheet prevents sticking and adds a rustic texture to the bread.
- For the signature wheat stalk shape, take your time making the cuts — it’s part of the charm of this artisan bread.
- Store leftovers properly to maintain freshness; freezing is ideal for longer storage.
